
AI/ML
 Chand Prakash
17 June 2026
Chand Prakash
17 June 2026
Digital Transformation in UAE Businesses: A Complete Guide
 Chand Prakash
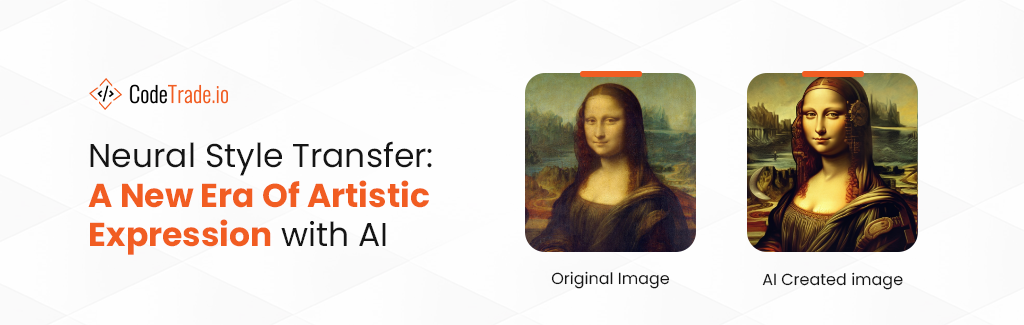
Art has always been a reflection of the human experience, an avenue for creativity and self-expression. Throughout history, various artistic movements and styles have emerged, each carrying the unique vision of artists and their cultural context. With the advent of artificial intelligence (AI), a new era of artistic expression has dawned, and one of the most captivating tools in this domain is Neural Style Transfer (NST).
Neural Style Transfer (NST) is a fascinating deep-learning technique that combines the content of one image with the artistic style of another to create visually appealing artworks. In this blog, we’ll delve into the details of NST and walk you through the process step by step, with Python code using TensorFlow and VGG19, a convolutional neural network (CNN) architecture.
Also Read: How To Train Image Captioning Model With TensorFlow
NST, introduced by Gatys et al. in 2015, utilizes deep neural networks to merge a content image and a style image. By extracting style and content features from these two images using a convolutional neural network (CNN), it generates a new image that maintains the content of the first image but adopts the style of the second.
In simpler terms, NST allows you to transform an ordinary photograph into an artistic masterpiece, mimicking the style of famous painters or applying unique visual effects. It’s like having a digital paintbrush that can instantly transform your images into works of art. This process involves optimizing the generated image to minimize two key components:
Let’s dive into the implementation of Neural Style Transfer (NST) step by step, using the given code.
Implementing Neural Style Transfer (NST) involves a series of steps that combine image processing, deep learning, and optimization techniques. Here’s a step-by-step guide:
To start, we import essential libraries, which include TensorFlow for deep learning, NumPy for numerical computations, and Matplotlib for visualizing images.
import tensorflow as tf
import numpy as np
import matplotlib.pyplot as plt
from tensorflow.keras.applications.vgg19 import VGG19, preprocess_input
from tensorflow.keras.preprocessing.image import load_img, img_to_array
from tensorflow.keras.models import Model
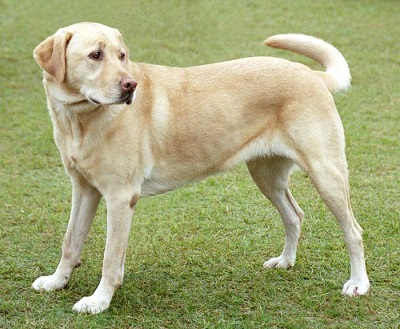
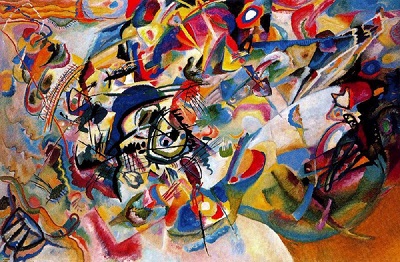
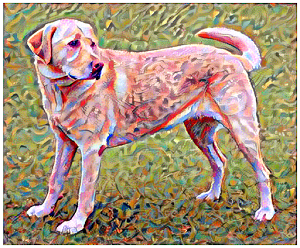
Next, import the content and style images using image processing functions. These images are fundamental for NST, with the content image supplying subject matter and the style image offering artistic style. Ensure image compatibility with the VGG19 model, which has specific format requirements.
content_path = tf.keras.utils.get_file('content.jpg','https://storage.googleapis.com/download.tensorflow.org/example_images/YellowLabradorLooking_new.jpg')

style_path = tf.keras.utils.get_file('style.jpg','https://storage.googleapis.com/download.tensorflow.org/example_images/Vassily_Kandinsky%2C_1913_-_Composition_7.jpg')
The VGG19 model, pretrained on ImageNet, forms the basis for extracting content and style features. To preserve its pre-trained knowledge and avoid alterations during NST, we freeze its weights for consistent feature extraction during style transfer.
vgg_model = VGG19(include_top=False, weights='imagenet')
vgg_model.trainable = False
To streamline the image-handling process, a set of helper functions is defined. Several helper functions are defined to load and preprocess images, deprocess images after generating them, and display images. These helper functions simplify the image manipulation tasks involved in the NST process.
def load_preprocess_image(image_path):
  img = load_img(image_path)
  img = img_to_array(img)
  img = preprocess_input(img)
  img = np.expand_dims(img, axis=0)
  return img

def deprocess_image(img):
  img[:, :, 0] += 103.939
  img[:, :, 1] += 116.779
  img[:, :, 2] += 123.68
  img = img[:, :, ::-1]
  img = np.clip(img, 0, 255).astype('uint8')
  return img

def display_img(image):
  if len(image.shape)==4:
    img = np.squeeze(image, axis=0)
  img = deprocess_image(img)
  plt.grid(False)
  plt.xticks([])
  plt.yticks([])
  plt.imshow(img)
  return

# Load and preprocess content image
content_img = load_preprocess_image(content_path)
display_img(content_img)
# Load and preprocess style image
style_img = load_preprocess_image(style_path)
display_img(style_img)
To capture content and style information from input images, specific layers of the VGG19 model are chosen for feature extraction. These layers are selected to represent various levels of visual information, ensuring comprehensive coverage of both content and style aspects in the images.
content_layer = 'block5_conv2'
content_model = Model(
    inputs=vgg_model.input,
    outputs=vgg_model.get_layer(content_layer).output
)

style_layers = [
    'block1_conv1',
    'block3_conv1',
    'block5_conv1'
]

style_models = [Model(inputs=vgg_model.input,
                      outputs=vgg_model.get_layer(layer).output) for layer in style_layers]
To guide NST, we establish two loss functions: content loss and style loss. These assess differences between the generated image and target images in content and style. We calculate content loss by computing the mean square difference in feature matrices between the generated and original content images, preserving the core content of the original.
def content_loss(content, generated):
  a_C = content_model(content)
  a_G = content_model(generated)
  loss = tf.reduce_mean(tf.square(a_C - a_G))
  return loss
The Gram matrix, a crucial tool in NST, quantifies relationships between image feature channels. It’s created by calculating the inner products of feature vectors and assessing visual elements’ interactions. This matrix represents the image’s style, encompassing its texture, patterns, and artistic characteristics.
def gram_matrix(A):
  channels = int(A.shape[-1])
  a = tf.reshape(A, [-1, channels])
  n = tf.shape(a)[0]
  gram = tf.matmul(a, a, transpose_a=True)
  return gram / tf.cast(n, tf.float32)

weight_of_layer = 1. / len(style_models)

def style_cost(style, generated):
    J_style = 0

    for style_model in style_models:
        a_S = style_model(style)
        a_G = style_model(generated)
        GS = gram_matrix(a_S)
        GG = gram_matrix(a_G)
        current_cost = tf.reduce_mean(tf.square(GS - GG))
        J_style += current_cost * weight_of_layer

    return J_style
Now we delve into the core of the Neural Style Transfer (NST) algorithm: the training loop. During each iteration of this loop, we compute the content loss and style loss for the generated image and then proceed to adjust the image by applying backpropagation.
generated_images = []

def training_loop(content_path, style_path, iterations=100, a=10, b=1000):
  content = load_preprocess_image(content_path)
  style = load_preprocess_image(style_path)
  generated = tf.Variable(content, dtype=tf.float32)

  opt = tf.keras.optimizers.Adam(learning_rate=7)

  best_cost = 1.7976931348623157e+308
  best_image = None
  for i in range(iterations):
        with tf.GradientTape() as tape:
            J_content = content_loss(content, generated)
            J_style = style_cost(style, generated)
            J_total = a * J_content + b * J_style

        grads = tape.gradient(J_total, generated)
        opt.apply_gradients([(grads, generated)])

        if J_total < best_cost:
            best_cost = J_total
            best_image = generated.numpy()

        print("Iteration :{}".format(i))
        print('Total Loss {:e}.'.format(J_total))
        generated_images.append(generated.numpy())

  return best_image
We invoke the “training_loop” function to train our model to obtain the best-generated image.
final_img = training_loop(content_path, style_path)
Ultimately, we visualize the generated images throughout the training process and showcase the most favorable outcome.
# Code to display the best-generated image and the last 10 intermediate results
plt.figure(figsize=(12, 12))
for i in range(10):
    plt.subplot(4, 3, i + 1)
    display_img(generated_images[i + 39])
plt.show()
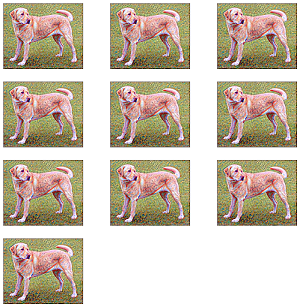
# Display the best result
display_img(final_img)
And that’s it! You’ve effectively carried out Neural Style Transfer with the help of TensorFlow and the VGG19 model. The generated image combines the content of the content image with the artistic style of the style image, creating a unique and visually appealing composition.
Don’t hesitate to explore diverse content and style images, adjust the hyperparameters, and delve into different iterations of NST to craft your unique artistic creations. If you need expert help, contact CodeTrade India, a leading AI ML Development Company.
 Chand Prakash
 Hardik Soni
 Chand Prakash
 Chand Prakash
 Chand Prakash