
AI
 Chand Prakash
21 July 2026
Chand Prakash
21 July 2026
RPA vs AI Agents for Business Automation: Which Is More Cost-Effective?
 Chand Prakash
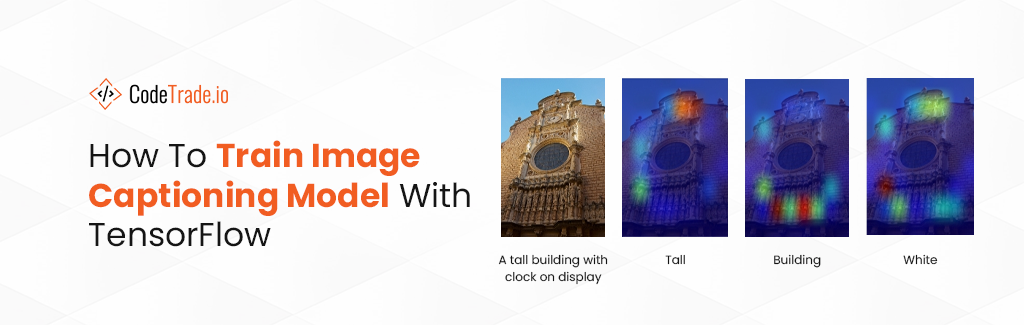
Image captioning is a process of generating a textual description of an image. It is a challenging task, as it requires the model to understand the content of the image and generate a coherent and informative caption. TensorFlow is a popular open-source machine learning framework that can be used to train image captioning models. It provides a number of tools and libraries that make it easy to train and deploy image captioning models.
Explore More: How to Create a Machine Learning Model in TensorFlow
In this blog post, we will discuss how to train an image captioning model with TensorFlow. We will also provide some tips on how to improve the performance of your model.
Image captioning with TensorFlow is a task that involves using a deep learning model to generate a description of an image in natural language. This can be done using a variety of different architectures, but one of the most common is to use an encoder-decoder architecture.
The encoder takes the image as input and extracts a high-level representation of its features. This representation is then passed to the decoder, which generates a sequence of words that describe the image. The decoder typically uses a recurrent neural network (RNN), such as an LSTM or GRU, to generate the caption.
To train a model for image captioning, you will need a dataset of images and their corresponding captions. One popular dataset for image captioning is the Flickr8k dataset, which contains 8,000 images and their corresponding captions.
Also Read: How To Train TensorFlow Object Detection In Google Colab: A Step-by-Step Guide
Before building creative image captioning applications with TensorFlow, let’s review the prerequisites.
Before you start working on the code, make sure you have the following libraries installed:
If you have not already installed the required libraries, you can do so using pip.
pip install tensorflow numpy pandas tqdm nltk Pillow matplotlib
To train an image captioning model with TensorFlow, you need the follow the given steps:
We’ll be using the Flickr8k dataset, which contains images along with five captions for each image. The Flickr8k dataset is a popular dataset for image captioning research. It contains 8,092 images, each with five corresponding captions. The dataset is divided into three sets: training, validation, and testing. Let’s start by dataset and preprocessing the data.
import os
import pickle
from tqdm.notebook import tqdm
import numpy as np
import pandas as pd
import tensorflow as tf
from tensorflow.keras.layers import Input, Flatten, Conv2D, Dense, LSTM, Embedding, Dropout, add
from tensorflow.keras.models import Model
from tensorflow.keras.preprocessing.image import load_img, img_to_array
from tensorflow.keras.applications.vgg16 import VGG16, preprocess_input
from tensorflow.keras.preprocessing.text import Tokenizer
from tensorflow.keras.preprocessing.sequence import pad_sequences
from tensorflow.keras.utils import to_categorical, plot_model

BASE_DIR = '/kaggle/input/flickr8k'
WORKING_DIR = '/kaggle/working'

# Load VGG model for image feature extraction
vgg_model = VGG16()
model = Model(vgg_model.inputs, vgg_model.layers[-2].output)

# Extract features from images and save them to a file
features = {}
directory = os.path.join(BASE_DIR, 'Images')
for img_name in tqdm(os.listdir(directory)):
    img_path = os.path.join(directory, img_name)
    image = load_img(img_path, target_size=(224, 224))
    image = img_to_array(image)
    image = tf.expand_dims(image, axis=0)
    image = preprocess_input(image)
    feature = model.predict(image, verbose=0)
    image_id = img_name.split('.')[0]
    features[image_id] = feature

# Save the image features to a file
pickle.dump(features, open(os.path.join(WORKING_DIR, 'features.pkl'), 'wb'))
To extract image features, we first load a pre-trained VGG16 model. Next, iterate over all the images in the dataset, preprocess them, and save the extracted features to a file.
Let’s load the captions from the dataset and prepare them for training. This involves tokenizing the text and converting it to a numerical representation.
# Load image features from the saved file
with open('/kaggle/working/features.pkl', 'rb') as f:
    features = pickle.load(f)

# Load captions from the captions.txt file
with open('/kaggle/input/flickr8k/captions.txt', 'r') as f:
    next(f)  # Skip the header
    captions_doc = f.read()

# Create a mapping of image IDs to captions
mapping = {}
for line in tqdm(captions_doc.split('n')):
    tokens = line.split(',')
    if len(line) < 2:
        continue
    image_id, caption = tokens[0], tokens[1:]
    image_id = image_id.split('.')[0]
    caption = " ".join(caption)
    if image_id not in mapping:
        mapping[image_id] = []
    mapping[image_id].append(caption)

# Clean and preprocess the captions
def clean(mapping):
    for key, captions in mapping.items():
        for i in range(len(captions)):
            caption = captions[i]
            caption = caption.lower()
            caption = caption.replace('[^A-Za-z]', '')
            caption = caption.replace('s+', ' ')
            caption = 'startseq ' + " ".join([word for word in caption.split() if len(word) > 1]) + ' endseq'
            captions[i] = caption

clean(mapping)
In the given code, we load the image features and captions from a file or database. Then create a mapping of image IDs to captions. Next, clean and preprocess the text by converting it to lowercase, stripping special characters, and adding special tokens “startseq” and “endseq” to indicate the start and end of a caption.
In the next step, we split the captions into words and assign each word a unique number. This is called tokenization. Prepare the data for training and testing by splitting it into two sets: a training set and a testing set.
# Tokenize the captions
all_captions = []
for key in mapping:
    for caption in mapping[key]:
        all_captions.append(caption)

tokenizer = Tokenizer()
tokenizer.fit_on_texts(all_captions)
vocab_size = len(tokenizer.word_index) + 1  # Vocabulary size

max_length = max(len(caption.split()) for caption in all_captions)  # Maximum caption length

# Split data into train and test sets
image_ids = list(mapping.keys())
split = int(len(image_ids) * 0.90)
train = image_ids[:split]
test = image_ids[split:]
Here, we use the Tokenizer class from Keras to tokenize the captions and determine the vocabulary size and maximum caption length. The training set teaches the image captioning model how to generate captions for images. The testing set evaluates how well the trained model can generate captions for images that it has never seen before.
To train the image captioning model, we need to create a data generator. This generator reads the image features and captions from the training set and splits them into batches of data.
def data_generator(data_keys, mapping, features, tokenizer, max_length, vocab_size, batch_size):
    X1, X2, y = list(), list(), list()
    n = 0
    while 1:
        for key in data_keys:
            n+=1
            captions = mapping[key]
            for caption in captions:
                seq = tokenizer.texts_to_sequences()[0]
                for i in range(1, len(seq)):
                    in_seq, out_seq = seq[:i], seq[i]
                    in_seq = pad_sequences([in_seq], maxlen = max_length)[0]
                    out_seq = to_categorical([out_seq],num_classes=vocab_size)[0]
                    X1.append(features[key][0])
                    X2.append(in_seq)
                    y.append(out_seq)

            if n == batch_size:
                X1, X2, y = np.array(X1), np.array(X2), np.array(y)
                yield [X1, X2], y
                X1, X2, y = list(), list(), list()
                n = 0

# Define input layers
inputs1 = Input(shape=(4096,))
fe1 = Dropout(0.4)(inputs1)
fe2 = Dense(256, activation='relu')(fe1)

inputs2 = Input(shape=(max_length,))
se1 = Embedding(vocab_size, 256, mask_zero=True)(inputs2)
se2 = Dropout(0.4)(se1)
se3 = LSTM(256)(se2)

# Merge features from image and text
decoder1 = add([fe2, se3])
decoder2 = Dense(256, activation='relu')(decoder1)
outputs = Dense(vocab_size, activation='softmax')(decoder2)

# Create the model
model = Model(inputs = [inputs1, inputs2], outputs = outputs)
model.compile(loss='categorical_crossentropy', optimizer='adam')

# train the model
epochs = 40
batch_size = 32
steps = len(train) // batch_size

for i in range(epochs):

    # Create data generator
    generator = data_generator(train, mapping, features, tokenizer, max_length, vocab_size, batch_size)
    # fit for one epoch
    model.fit(generator, epochs=1, steps_per_epoch=steps, verbose=1)
This code defines an image captioning model with two main parts:
The image feature extractor and text decoder are connected together, and the model is trained to minimize the categorical cross-entropy loss using the Adam optimizer.
Let’s evaluate the image captioning model using the BLEU (Bilingual Evaluation Understudy) score. This is a common metric for evaluating the quality of generated captions by comparing them to human-written captions.
To calculate the BLEU score, compare the n-grams (sequences of n words) of the generated caption to the n-grams of the human-written captions. The BLEU score is a value between 0 and 1, with a higher score indicating more similarity between the generated and human-written captions.
from nltk.translate.bleu_score import corpus_bleu

actual, predicted = list(), list()
for key in tqdm(test):
    captions = mapping[key]
    y_pred = predict_caption(model, features[key], tokenizer, max_length)
    actual_captions =
    y_pred = y_pred.split()
    actual.append(actual_captions)
    predicted.append(y_pred)

# Calculate BLEU scores
print("BLEU-1: %f" % corpus_bleu(actual, predicted, weights=(1.0, 0, 0, 0)))
print("BLEU-2: %f" % corpus_bleu(actual, predicted, weights=(0.5, 0.5, 0, 0)))
This code calculates the BLEU-1 and BLEU-2 scores for the model’s predicted captions compared to the actual captions in the test set. The BLEU score is a common metric for evaluating the quality of generated captions by comparing them to human-written captions.
To generate captions for new images using a trained image captioning model, you can follow these steps:
from PIL import Image
import matplotlib.pyplot as plt

def generate_caption(image_name):
    # Load the image
    image_id = image_name.split('.')[0]
    img_path = os.path.join(BASE_DIR, "Images", image_name)
    image = Image.open(img_path)
    captions = mapping[image_id]

    print('---------------------Actual---------------------')
    for caption in captions:
        print(caption)

    # Predict and display the caption
    y_pred = predict_caption(model, features[image_id], tokenizer, max_length)
    print('--------------------Predicted--------------------')
    print(y_pred)

    # Display the image
    plt.imshow(image)
The generate_caption() function takes the filename of an image as input and loads the image. Then, it uses the trained model to generate both the actual captions and the predicted caption for the image. Finally, it displays the image along with the captions.
Congratulations! You have successfully built an image captioning model using TensorFlow and can now generate captions for new images. If you are a beginner in image captioning with tensorflow, start trying to generate captions for different images to see how well your model performs.
Make sure to update the file paths and directory names in the code to match your own setup.
Training an image captioning model with TensorFlow can be challenging, but it is also very rewarding. By following the steps above, you can train a model that can generate accurate and descriptive captions for images. If you want to hire smart and dedicated developers for your AI and ML projects. Hire smart and dedicated developers from CodeTrade!
CodeTrade has a team of highly experienced AI and ML experts who can help you achieve your business goals. Whether you need help with developing a new AI-powered product or improving your existing AI systems, CodeTrade can help. Contact CodeTrade today to learn more about our AI and ML software development services.
Happy image captioning!
 Chand Prakash
 Chand Prakash
 Hardik Soni
 Chand Prakash
 Chand Prakash