
Mounting Process Made Easy In Tutor Dev Olive
Tutor Dev Olive is a powerful tool for developing and testing web applications. It provides a variety of features to help developers get their work done quickly and easily. One of these features is the mounting process.
The mounting process is how Tutor Dev Olive makes your application's files available to the web server. This is a critical step in the development process, as it allows you to test your application in a live environment.
Before the new upgraded features and functionalities, the mounting process in Tutor Dev Olive could be a bit complex. With the latest release, the process has been made much easier.
In the previous blog, we discussed the installation process of Tutor Dev Olive release, now it’s time to utilize Olive Release in your local system. You can refer to the given link for a refresher on the installation steps.
Read More: Tutor Dev Olive Installation: A Quick and Easy Tutorial
Here are the steps on how to mount your application files in Tutor Dev Olive:
Mounting Process in Tutor Dev Olive
1. Copy Container Files in Your Local System
In order to mount the files from the local to the container, it is necessary to copy the files of the container into the local system. The following command can be helpful to copy the container’s files: (For example, In our case we have copied the lms container folder)
$ tutor dev copyfrom lms /openedx/edx-platform/ home/codetrade/Tutor_files/olive_tutor/edx-platform
For other services, you can utilize the following format:
$ tutor dev copyfrom (SERVICE) (CONTAINER-PATH) (HOST-PATH)2. Mount All Container Files/Folder
Once the folder has been successfully copied, you can initiate the mounting process by executing this command. The command will effectively mount all containers that rely on the contents of this particular folder.
$ tutor dev launch --mount=edx-platform
Note: In case the above mention method does not work or you’re mounting other container’s files instead of LMS. Follow the given steps:
3. Mount Other Container Files
Use the given command to mount other container files instead of LMS(in our case we used discovery shell to mount)
$ tutor dev launch --mount=discovery:/home/codetrade/Tutor_files/olive_tutor/discovery:/openedx/discoveryTo access other services, you can use the provided format:
$ tutor dev launch --mount=SERVICE:HOST_PATH:CONTAINER-PATH4. Save and check the YML file
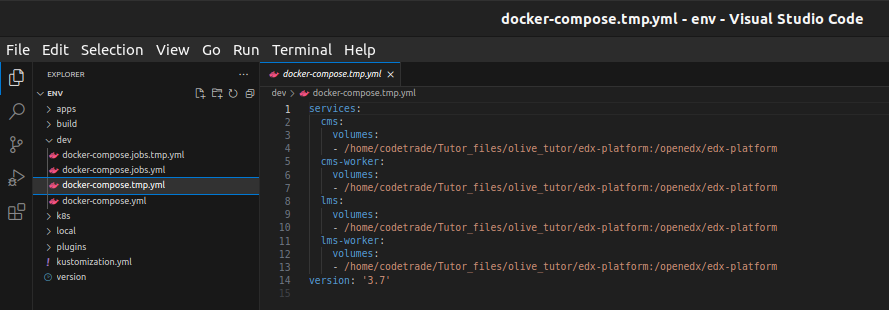
After mounting you can check in the “docker-compose.tmp.yml” file for the changes.
5. Create a new YML file and Save the changes
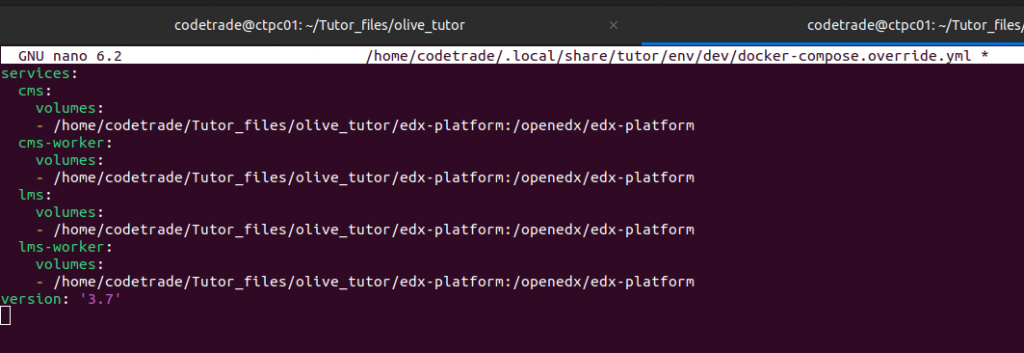
In the “docker-compose.tmp.yml” file, there are 4 files that are mounted with the edx-platform. And to save all these changes permanently, create a new file “docker-compose.override.yml” from the terminal :
$ nano "$(tutor config printroot)/env/dev/docker-compose.override.yml"Save the precise services outlined in 'docker-compose.tmp.yml' into this new file.
6. Start and Stop Services
Once you've saved the new file, halt the running containers using the command
$ tutor dev stopThen proceed to launch them again with the command
$ tutor dev start -dAfter that, the containers will stay mounted even when they are stopped.
Explore More: Give Your Tutor Dev Olive A New Look With A Theme Change
Final Words
With these steps, you can easily mount in tutor dev olive and streamline your web application development and testing workflow. As the platform continues to evolve, developers can expect even more enhancements and features that contribute to an even smoother development experience.
Still confused? Connect with the skilled Open edX developers at CodeTrade for guaranteed outcomes. As a prominent open edX development agency in India, CodeTrade boasts a team of exceptionally qualified open edX developers ready to assist you in managing your open edX project effectively. Get in touch now and ensure top-notch Open edX development services from CodeTrade.