
Open edX Development
 Chand Prakash
29 August 2025
Chand Prakash
29 August 2025
The Secret Behind Fortune 500 Employee Onboarding? Open edX.
 Chand Prakash
Tutor Dev Palm release brings exciting possibilities for developers that promise enhanced efficiency and smoother workflows. After successfully installing the Tutor Dev Palm Release on your system, now it’s time to utilize palm release in your local system. If you need a refresher on the installation steps, you can refer to the provided link.
Read More: Step-By-Step Guide For Tutor Dev Installation With Palm Release
This comprehensive guide will walk you through mounting in Tutor Dev Palm Release. Whether you’re a seasoned developer or a beginner, you’ll gain the ability to fully harness the capabilities of this new development environment by the conclusion of this guide. Let’s delve into the steps on how to mount in Tutor Dev Palm Release.
Follow the steps to mount the edx-platform directory into your system
Copy the folder from the container to the host
$ tutor dev copyfrom lms /openedx/edx-platform ~/tutor_palm/edx-platform

$ tutor mounts add ./edx-platform

This will add the edx-platform directory from your local machine as a mounted directory within the Docker containers. This enables you to make code changes and customizations to the platform’s source code and see those changes reflected in the running environment.
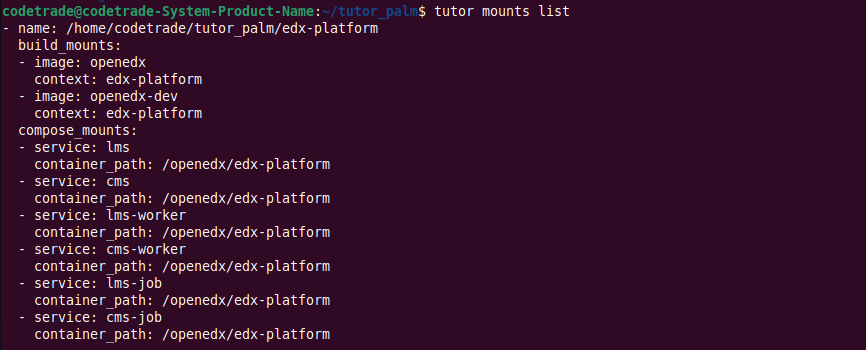
To verify if the mount is correctly set up, perform the following command
$ tutor mounts list
Save your modifications using the given command.
$ tutor config save

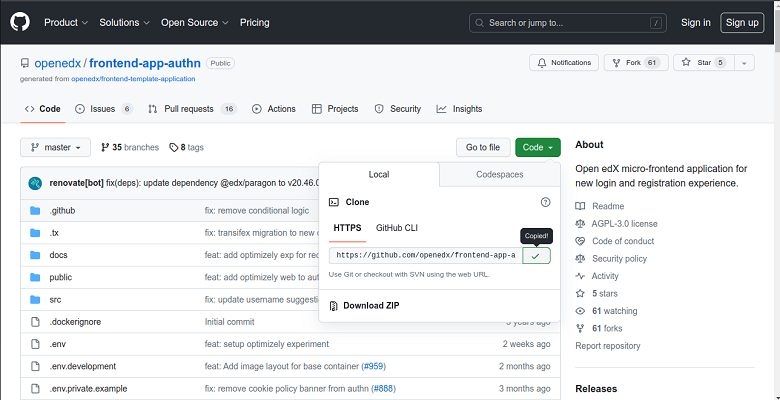
Go to https://github.com/openedx/frontend-app-authn.git and search for “palm”.

Select palm and then copy the https code from the green “Code” button shown below.
Clone the repository inside your tutor_palm directory
$ git clone https://github.com/openedx/frontend-app-authn.git

Then rename the folder with “app”
$ tutor mounts add ./app

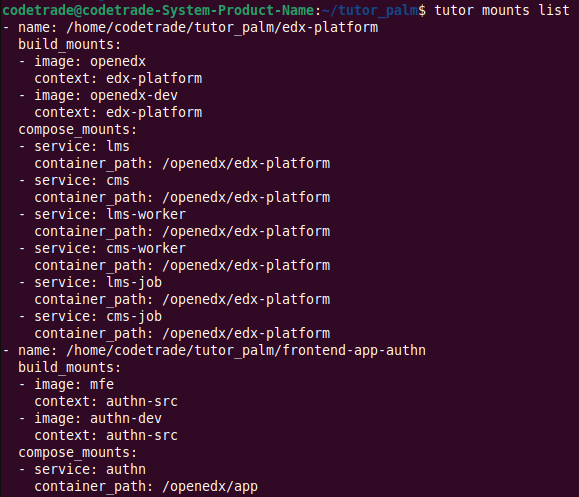
$ tutor mounts list
The given command is used to retrieve a list of the mounted directories or volumes within the context.
$ tutor config save
Re-execute the “tutor config save” command to save all changes.
In this guide, we’ve covered the step-by-step process of mounting in the Tutor Dev Palm Release. Set up your environment to verify the successful mounting, you’re now equipped with the knowledge to make the most of this powerful development environment. Embrace the seamless integration and efficiency that Tutor Dev Palm offers, and elevate your Open edX development journey.
If you still experience any challenges with your Open edX projects, feel free to reach out to CodeTrade, a leading Open edX development agency. They offer reliable Open edX services to provide you with the assistance you need. Get in touch with CodeTrade Now…!
 Chand Prakash
 Chand Prakash
 Chand Prakash
 Chand Prakash
 Chand Prakash