
Open edX Development
 Chand Prakash
22 June 2026
Chand Prakash
22 June 2026
Open edX + AI Tutors: The 2026 Stack for Corporate Learning
 Chand Prakash

Are you eager to start with Tutor Dev Olive but unsure how to install it? Fear not! This comprehensive tutorial will guide you through the simple steps to install Tutor Dev Olive on your system. Whether you are a seasoned developer or a curious beginner, this article will equip you with everything you need to know. So, let’s dive in and make the installation process a breeze!
A tutor is a tool that helps you build and deploy interactive learning experiences for your Open edX LMS. It simplifies the process of creating, managing, and delivering interactive educational content. Tutor Dev Olive is a development version of Tutor that includes features that are not yet available in the stable release.
With Tutor Dev Olive, you can build interactive coding exercises, quizzes, and various learning materials for your students or learners. Its versatility makes it an excellent choice for anyone involved in educational content creation.
Before you begin, you will need to make sure that you have the following prerequisites installed on your system:
Note: We tested on these Docker versions to install Tutor Dev Olive
Steps to Install Docker
$ sudo apt-get remove -y docker docker-ce docker-ce-cli containerd.io
$ apt-cache madison docker-ce | awk ‘{ print $3 }’
$ VERSION_STRING={docker_version}
$ sudo apt-get install -y docker-ce=$VERSION_STRING docker-ce-cli=$VERSION_STRING containerd.io docker-buildx-plugin docker-compose-plugin
$ sudo systemctl status docker
$ docker –version
Steps to install Docker-Compose
$ sudo apt-get remove docker-compose
$ apt-cache madison docker-compose | awk ‘{ print $3 }’
$ sudo curl -L “https://github.com/docker/compose/releases/download/1.29.2/docker-compose-$(uname -s)-$(uname -m)” -o /usr/local/bin/docker-compose
$ sudo chmod +x /usr/local/bin/docker-compose
$ docker-compose –version
With the provided instructions, you can effortlessly set up Docker and Docker-compose with the versions you need. Next, let’s see how to install tutor dev olive step-by-step.
Follow the given simple steps to set up Tutor Dev Olive on your system:
Create a new edX directory for tutor installations
$ mkdir olive_tutor
Navigate to the “olive_tutor” directory
$ cd olive_tutor
With the following command, you will find the tutor package v15.3.6 along with its optional dependencies labeled as “full.” The program will then download the package and any required dependencies from the Python Package Index (PyPI) and install them.
$ pip install “tutor[full]==v15.3.6”

Run the given command to check the installed tutor version
$ tutor –version
![]()
After successfully installing Tutor, launch Tutor development environment.
$ tutor dev launch
Next, the process will ask for three details related to the Tutor platform to be saved in the config.yml file.
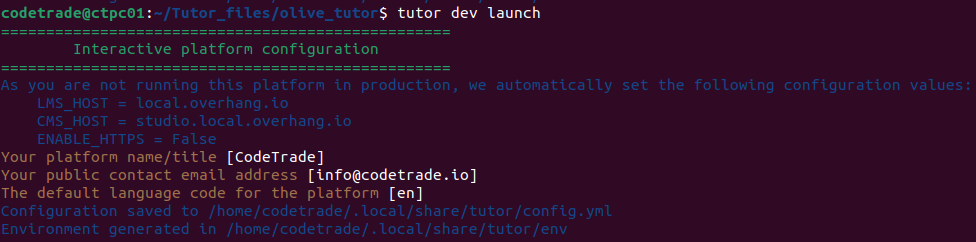
After the installations are completed, services will get started. The tutor is installed successfully.

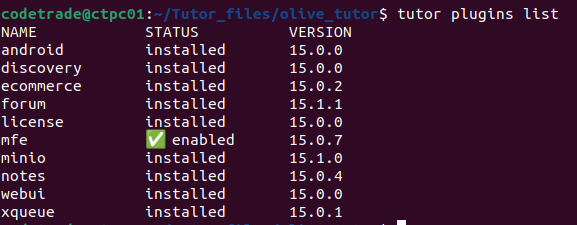
Tutor plugins are disabled in Tutor 15.3.6. In order to install Olive in Tutor, we must enable the tutor plugins. Before enable tutor plugins we need to check the list of available plugins:
$ tutor plugins list
Execute the given command to enable or disable plugins.
$ tutor plugins enable/disable (plugin-name)
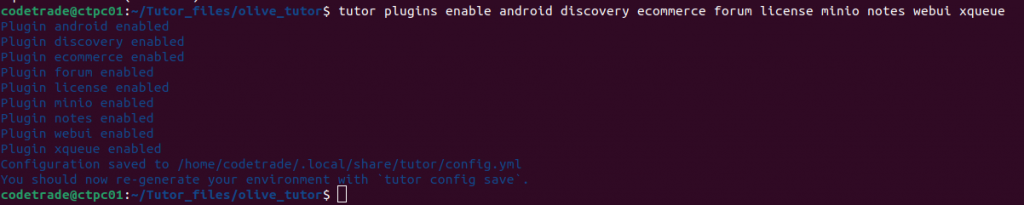
Once plugins have been enabled or disabled, or any changes to the configuration have been made, it is important to save the config.yml file.
$ tutor config save

Relaunch tutor dev using the command “tutor dev launch”.
$ tutor dev launch
Note: When we relaunch Tutor Dev, we encountered a manifest error due to plugin version compatibility and did not receive the required file. How can manifest errors be resolved? To resolve these errors, we need to follow a comprehensive set of steps.
If you encounter manifest errors, search for the filename causing the issue in Docker and attempt to locate the closest available version. Below image can show an example of a Manifest error.

Using Docker hub you can find your required file from the given link: https://hub.docker.com/r/overhangio/openedx-payment-dev/tags
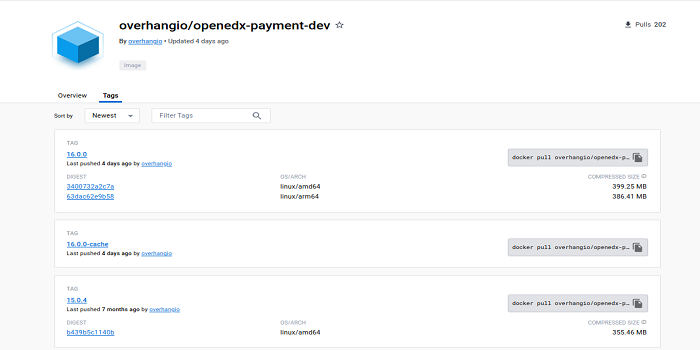
For Example, When we try to install Tutor Dev Olive and encounter a manifest error, we need to use a lower version of “tutor-mfe” in order to complete the installation. It is necessary to uninstall the existing plugins first before reinstalling them.
Follow the given steps to change the installed version of Tutor Plugins
$ pip freeze | grep tutor

$ pip uninstall -y

Note: Here, we need to change the MFE plugin version so we put “tutor -mfe” in the command.
$ pip install (plugin-name)==(plugin-version)

$ tutor plugins update

Save the config.yml file using the command “tutor config save” and run the command “tutor dev launch”.
$ tutor config save
And relaunch tutor dev using the given command
$ tutor dev launch
You can now use Tutor to create and manage your own Open edX platform at http://local.overhang.io:8000
Congratulations! You have successfully installed Tutor Dev Olive on your system.
By following the above given simple installation steps you can easily install Tutor Dev Olive without getting any error. Embrace its user-friendly interface, customizable environment, and powerful extensions to take your coding experience to new heights.
If you still face any issues with installation, hire open edX experts from CodeTrade to leverage the benefits of easy installation and a smooth process. CodeTrade is a well-respected open edX agency. Our team of highly experienced experts is dedicated to helping you solve any issues you may have with the platform, while also providing you with reliable, guaranteed services.
Happy coding with Tutor Dev Olive!
 Chand Prakash
 Chand Prakash
 Chand Prakash
 Chand Prakash
 Chand Prakash