
Open edX Development
 Chand Prakash
29 August 2025
Chand Prakash
29 August 2025
The Secret Behind Fortune 500 Employee Onboarding? Open edX.
 Chand Prakash

Tutor is a Docker-based Open edX distribution designed to make it easy to install, configure, and manage an Open edX platform. Tutor can be used to deploy a production-ready Open edX platform, or it can be used to develop and test new features.
In this article, we will walk you through the seamless installation process of Tutor Dev with the latest Palm release. Our step-by-step guide will ensure that you can set up this powerful and user-friendly platform effortlessly.
Tutor is a software platform developed to simplify the deployment and management of Open edX instances. It is an open-source project that helps administrators and educators set up their own Open edX platforms with ease. Tutor automates the process of installation, configuration, and maintenance, making it more convenient for institutions and individuals to host and manage their online courses using Open edX.
Tutor Dev Installation allows users to experiment and test various configurations and customizations without affecting the production environment. This sandboxed setup empowers developers to troubleshoot, iterate, and fine-tune their platform effortlessly. Furthermore, dev mode enables easy access to the latest features and updates, fostering a continuous improvement cycle.
As a result, users can confidently experiment with new plugins, themes, and modules, ensuring a seamless learning experience for their students. Ultimately, opting for dev mode installation opens the door to a world of flexibility, innovation, and growth for educators, making Tutor an indispensable tool in the arsenal of every Open edX enthusiast.
To forward the step-by-step instructions for installing Tutor with the Palm Release version, it is necessary to check the prerequisites for installing the version without any errors.
Before proceeding with the installation, ensure that you have the following prerequisites in your system.
To install Tutor Dev on the Palm release, it requires:
Note: We tested on these Docker versions to install Tutor Dev on Palm Release
First, uninstall the older version (if less than v20.10.15 CE)
Use the given command to identify the installed docker package you have
$ dpkg -l | grep -i docker
Remove all the specified Docker-related packages and their associated configuration files.
$ sudo apt-get purge -y docker-engine docker docker.io docker-ce docker-ce-cli docker-compose-plugin
Run the given command to ensure that any residual or unnecessary packages are removed to free up disk space and keep your system clean
$ sudo apt-get autoremove -y –purge docker-engine docker docker.io docker-ce docker-compose-plugin
The previously mentioned commands won’t eliminate images, containers, volumes, or custom configuration files on your host system. To completely remove all images, containers, and volumes, execute the subsequent commands:
$ sudo rm -rf /var/lib/docker /etc/docker
$ sudo rm /etc/apparmor.d/docker
$ sudo groupdel docker
$ sudo rm -rf /var/run/docker.sock
Execute the given command to ensure the package manager updated with the latest information about available software versions
$ sudo apt-get update
Install three packages (ca-certificates, curl, and gnupg)
$ sudo apt-get install ca-certificates curl gnupg
Create a directory named /etc/apt/keyrings with specific permissions
$ sudo install -m 0755 -d /etc/apt/keyrings
Add GPG key for the Docker repository on your System
$ curl -fsSL https://download.docker.com/linux/ubuntu/gpg | sudo gpg –dearmor -o /etc/apt/keyrings/docker.gpg
Now, Instruct the system to add read permissions for all users to the docker.gpg file within the /etc/apt/keyrings/ directory.
$ sudo chmod a+r /etc/apt/keyrings/docker.gpg
Set up the Repository
$ echo “deb [arch=”$(dpkg –print-architecture)” signed-by=/etc/apt/keyrings/docker.gpg] https://download.docker.com/linux/ubuntu “$(. /etc/os-release && echo “$VERSION_CODENAME”)” stable” | sudo tee /etc/apt/sources.list.d/docker.list > /dev/null
Ensure the package manager contains the latest information about available software versions
$ sudo apt-get update
Execute the command to show all the available versions
$ apt-cache madison docker-ce | awk ‘{ print $3 }’
Replace the version with your needed version in VERSION_STRING
$ VERSION_STRING={docker_version}
Download and Install Docker to use on your system
$ sudo apt-get install docker-ce=$VERSION_STRING docker-ce-cli=$VERSION_STRING containerd.io docker-buildx-plugin docker-compose-plugin
Check the installed version of Docker
$ docker –version
Add your Username to the Docker Group:
$ sudo usermod -aG docker ${USER}
Apply the new group membership, log out from the server, and then log in or type the following command:
$ su – ${USER}
You will be prompted to enter your user’s password to continue. Once done, verify that your user has been successfully added to the docker group by typing:
$ groups
In case you want to add a user to the docker group while being logged in as a different user, make sure to mention the target username explicitly by using:
$ sudo usermod -aG docker {username}
Tutor version 16.0.0+ (Palm) no longer supports docker compose, which is also referred to as Compose V1. To continue using the docker compose functionality, it’s necessary to install the docker compose (no hyphen) plugin.
$ mkdir -p ~/.docker/cli-plugins/
$ curl -SL https://github.com/docker/compose/releases/download/v2.3.3/docker-compose-linux-x86_64 -o ~/.docker/cli-plugins/docker-compose
Set execution permission on the file /.docker/cli-plugins/docker-compose that allow users to run it as an executable program
$ chmod +x ~/.docker/cli-plugins/docker-compose
$ docker compose version
Create an edX Directory using mkdir tutor_palm Command on the Terminal.
$ mkdir tutor_palm
Navigate to the “tutor_palm” directory using the following command:
$ cd tutor_palm/
Run the following command to install Tutor along with its optional dependencies marked as “full” from PyPI:
$ pip install “tutor[full]==16.0.3”
![]()
Verify that Tutor is installed correctly by checking its version:
$ tutor –version
![]()
Once Tutor is successfully installed, you can use it to launch a development environment using the following command:
$ tutor dev launch
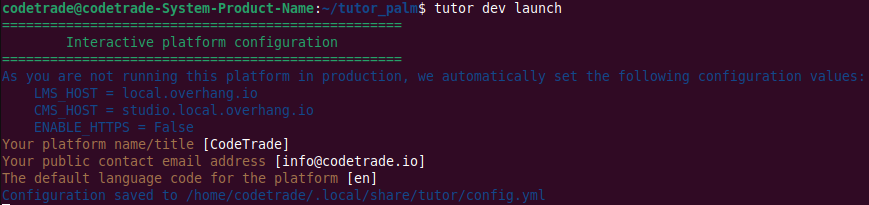
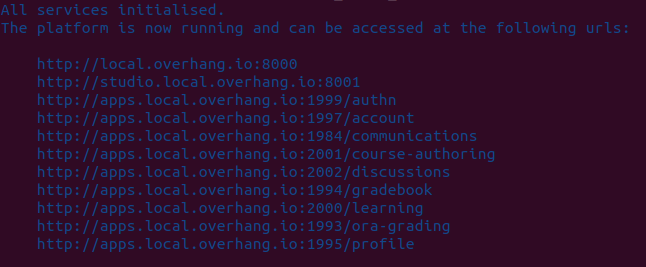
The following data will be displayed at the end of a successful installation.
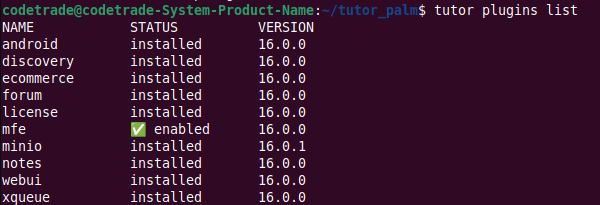
MFEs are already enabled in the tutor 16.0.0 version, you can check using the given command
$ tutor plugins list
When Tutor with Palm Release has been installed successfully, it appears in the browser as follows:
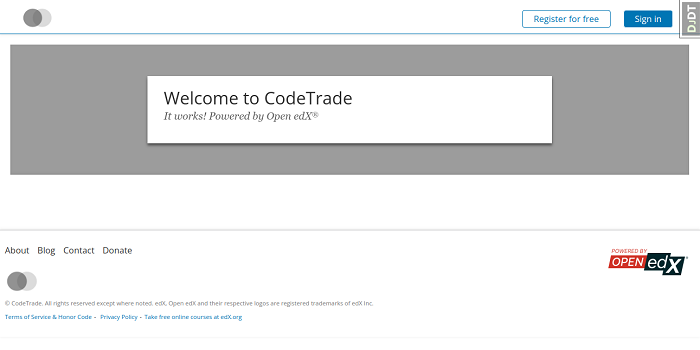
That’s it! You have successfully installed Overhang.io Tutor Palm Release and launched a development environment. You can now use Tutor to create and manage your own Open edX platform.
In this blog post, we showed you how to install Tutor Dev with the Palm release. Tutor is a powerful tool that can make it easy to install, configure, and manage an Open edX platform. If you are looking for a way to get started with Open edX, get in touch with the trusted Open edX partner CodeTrade. As an Open edX agency that offers services like consulting, support services, maintenance as well as individual developmental support for individual components of your LMS. Contact Now…!
 Chand Prakash
 Chand Prakash
 Chand Prakash
 Chand Prakash
 Chand Prakash