
Open edX Development
 Chand Prakash
22 June 2026
Chand Prakash
22 June 2026
Open edX + AI Tutors: The 2026 Stack for Corporate Learning
 Chand Prakash

Hello developers! If you’re looking to get started with Tutor Dev Nutmeg, you’ve come to the right place. Tutor Dev Nutmeg is a powerful and user-friendly tool that will help you set up and manage online learning platforms effortlessly. In this blog, we’ll walk you through a simple step-by-step installation guide for Tutor Dev Nutmeg. Let’s get started!
Tutor Dev Nutmeg is a powerful development tool that streamlines the process of creating web applications. It is an integrated development environment specifically designed for web developers. With its user-friendly interface and extensive feature set, Tutor Dev Nutmeg has quickly become a favorite among developers worldwide.
Let’s move toward the installation process of Tutor Dev Nutmeg, but before diving into the process we have to clarify the prerequisite, which is required to successfully install tutor dev nutmeg.
Before installing Tutor version 14 with the edX nutmeg version, You have to install:
Note: We tested on these Docker versions to install Tutor Dev Nutmeg
To install Docker in your system, you need to follow the given steps.
$ sudo apt-get remove -y docker docker-ce docker-ce-cli containerd.io
$ sudo apt-cache madison docker-ce | awk ‘{ print $3 }’
$ VERSION_STRING={docker_version}
$ sudo apt-get install -y docker-ce=$VERSION_STRING docker-ce-cli=$VERSION_STRING containerd.io docker-buildx-plugin docker-compose-plugin
$ sudo systemctl status docker
$ docker –version
To install docker-compose
$ sudo apt-get remove docker-compose
$ apt-cache madison docker-compose | awk ‘{ print $3 }’
$ sudo curl -L “https://github.com/docker/compose/releases/download/1.29.2/docker-compose-$(uname -s)-$(uname -m)” -o /usr/local/bin/docker-compose
$ sudo chmod +x /usr/local/bin/docker-compose
$ docker-compose –version
Follow these step-by-step instructions to install Tutor Dev Nutmeg on your system:
$ mkdir tutor_nutmeg
Change your working directory to the “tutor_nutmeg” repository
$ cd tutor_nutmeg
$ pip install “tutor[full]==v14.2.3”
(Note: We use tutor v14.2.2 for installing nutmeg, it can be changed according to your requirements)
$ tutor –version

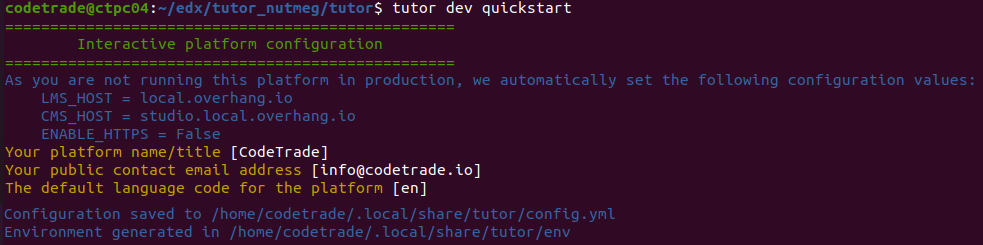
Use the given command that initiates the quickstart process for setting up Tutor Dev Nutmeg
$ tutor dev quickstart
Subsequently, the process will prompt you to provide three details related to the Tutor platform, which will be saved in the config.yml file.
When the services are initialized one by one, encounter an error due to LMS:
ERROR: for tutor_dev_lms_1 Cannot start service lms: driver failed programming external connectivity on endpoint tutor_dev_lms_1 (9570d3c84d0d206a2a0151dba0481c11872775c331f9c320658d7548ad4c722c): Error starting userland proxy: listen tcp6 [::]:8000: bind: address already in use

The error message you encountered is related to a problem with starting the “lms” service in the “tutor_dev” container.
The common reason for this error is conflict with other application using port 8000, where the Open edX LMS typically runs. To fix this, stop the conflicting application or change the LMS port number in the configuration files or environment variables. Resolving the port conflict will allow the “LMS” service to start without any issues.
$ sudo lsof -i :8000
Then kill the process ID using the given command:
$ sudo kill (PID)

In our Case, the encountered error is caused by the “tcp6” type, so we need to terminate the process ID (PID) associated with “tcp6”. Re-execute the tutor Quickstart command
$ tutor dev quickstart
When running the quickstart process again, you encounter an 8001 error related to the CMS (Course Management System).
ERROR: for cms Cannot start service cms: driver failed programming external connectivity on endpoint tutor_dev_cms_1 (f7200be76a8d1d108496dcca09412215d3686e64e16e047f2b3510d37a01d32a): Error starting userland proxy: listen tcp4 0.0.0.0:8001: bind: address already in use
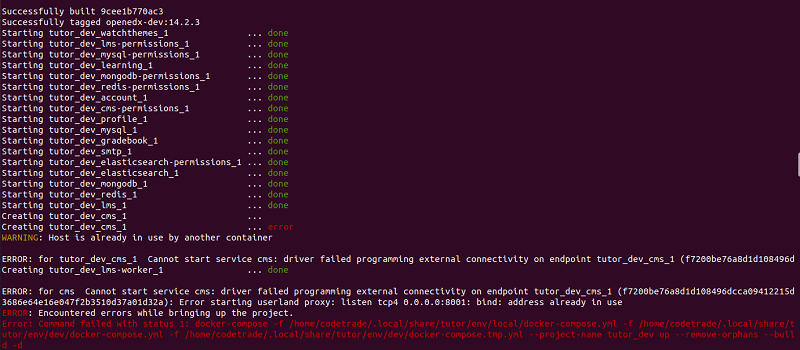
This error occurs because another application or service is already using port 8001. If another instance or application is using that port, it will cause a conflict and prevent the new CMS service from starting.
To fix the issue, either stop the application using port 8001 or change the Open edX CMS port number in the configuration files or environment variables. After resolving the port conflict, the “CMS” service will start without any problems.
$ sudo lsof -i :8001
$ sudo kill (PID)

In our case, the encountered error is caused by the “tcp4” type, so we need to terminate the process ID (PID) associated with “tcp4”. Run the Quickstart command again
$ tutor dev quickstart
Upon re-executing the “tutor dev quickstart” command, we receive the following output as a result.

Next, execute the command to check tutor plugins.
$ tutor plugins list
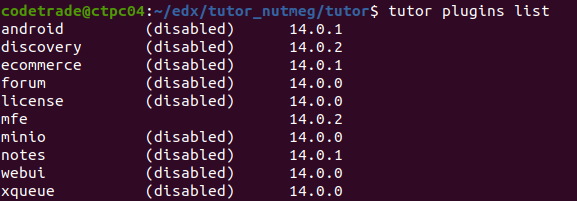
As you can see in the above Image, plugins are disabled in tutor version v14.2.3. To successfully complete the installation of Nutmeg with Tutor Dev, it is necessary to enable the required Tutor plugins.
$ tutor plugins enable/disable (plugin-name)

After enabling or disabling plugins, or making any changes to the configuration, it is crucial to save the config.yml file.
$ tutor config save

Save the modifications made in the config.yml file by using the command “tutor config save” and then proceed to execute the “tutor dev quickstart” command.
$ tutor dev quickstart
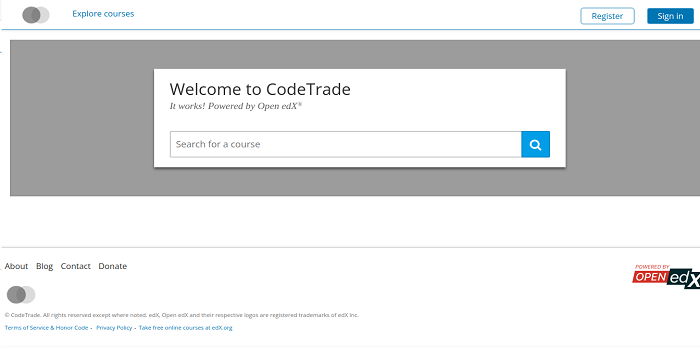
Congratulations! You have successfully installed Tutor Dev Nutmeg and created your own Open edX instance for local development.
Now you can use Tutor Dev Nutmeg to create and manage your own Open edX platform at http://local.overhang.io:8000
Tutor Dev Nutmeg simplifies the process of managing and working with Open edX, making it an ideal choice for educators, developers, and anyone interested in e-learning platforms.
If you still facing any issues regarding the tutor dev nutmeg installation, you can consult with our Open edX experts. We, at CodeTrade, a reputed open edX development agency and Open edX partner, provide Open edX solutions tailored to meet diverse e-learning needs.
With a team of skilled developers and educators, CodeTrade offers a wide range of services, including Open edX installation, customization, theming, and integration with third-party tools. Our expertise and dedication to client satisfaction, CodeTrade continues to pave the way for innovative and impactful e-learning experiences.
Get Free consultation from CodeTrade, Contact Now…!
 Chand Prakash
 Chand Prakash
 Chand Prakash
 Chand Prakash
 Chand Prakash