


Mobile App Development
 Abhishek Karad
12 November 2025
Abhishek Karad
12 November 2025
How to choose the Best Flutter App Development Company in the USA in 2026
 Abhishek Karad
Before diving into the core issue, let’s first discuss the importance of permissions. We have a package known as “permission_handler”, which offers a cross-platform (iOS and Android) API for requesting permissions and checking their status. You can refer to the documentation for this package at https://pub.dev/packages/permission_handler. However, it’s essential to note that there is no inherent issue with this package itself. Our concern lies elsewhere, and we will explore it in detail shortly. in this blog we’ll discuss how to handle flutter app permissions.
Consider a scenario in which we request specific permission from the “permission_handler” package. When the app requests permission, it prompts the user to grant or deny access. What if we want to enforce a strict policy where, if the user denies permission, they cannot use the app’s functionalities until they grant the necessary permission?
Let’s illustrate this scenario with an example involving the Camera permission. If the user denies Camera permission initially, we’ve implemented code to display a dialog box. This dialog box contains a single button that directs the user to the app’s settings which allows them to grant the required permission. After returning to the app following the permission grant, this is where the issue arises.
The problem is that even after the user grants permission, the status does not update accordingly. The dialog box remains visible, even though the user has provided the necessary permission. This situation is undesirable for developers who want their apps to function seamlessly. Let’s check how to address and resolve this particular challenge.
Before we embark on our discussion, it’s crucial to establish the significance of initiating permission requests in the early stages of any Flutter application.
Explore More: Empower Your App Development with Top-Rated Flutter Developers
As a prerequisite, we need to add a package in pubspec.yaml file.
dependencies:
 flutter:
   sdk: flutter

 permission_handler: “the latest version of this package”
After that to begin with, we discussed the importance of requesting permission in the initial state of our application. This means that we should prompt the user for permission as soon as the app starts.
To achieve this, we will start by creating a function responsible for requesting permission and handling all possible scenarios. This function will be called within the init state of our app. Additionally, we will ensure that if the user does not grant permission, they won’t be able to proceed any further. Here’s the function:
compulsoryPermission() async {
PermissionStatus firstPermission = await Permission.camera.request();
if (firstPermission.isGranted) {
return;
} else if (firstPermission.isPermanentlyDenied ||
firstPermission.isDenied) {
if (context.mounted) {
showDialog(
context: context,
barrierDismissible: false,
builder: (context) {
return WillPopScope(
onWillPop: () async {
return true;
},
child: AlertDialog(
actions: [
OutlinedButton(
onPressed: () async {
await openAppSettings();
},
child: const Text("Open Settings")),
],
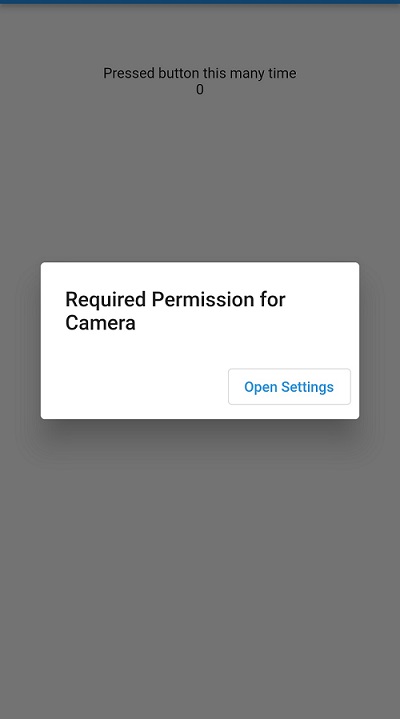
title: const Text("Required Permission for Camera"),
),
);
},
);
}
}
}
In this code snippet, using the ‘compulsoryPermission’ function, we check the permission status specifically for any app access. Here, we used camera permission as an example, but you can replace it with any other mission provided by the permission_handler package as needed.
If the permission is already granted, we simply return from the function. However, if the permission is not granted, we proceed to request it once more. If the permission is permanently denied, we present an alert box containing a title and an outlined button. The below image shows the alert box which will appear if camera permission is not granted.
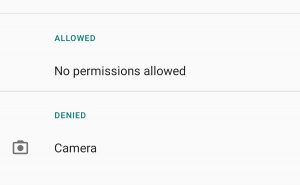
It’s worth mentioning that the permission_handler package also enables us to open the application settings. Therefore, when the outlined button within the alert box is tapped, the user can navigate to the app settings to grant the necessary permission.
In the alert box, we have set the property ‘barrierDismissible’ to false. This setting prevents the alert box from disappearing if the user taps outside of it. This behavior is intentional, as we want to restrict the user from moving forward in the app unless the required permission is granted.
Additionally, we have enclosed this alert box within a WillPopScope widget. Within this widget, the ‘onWillPop’ function returns true. Consequently, if the user attempts to go back or dismiss the alert box using the device’s back button, the alert box will persist. The user’s only option in this scenario is to open the app settings to grant the necessary permission.
One important aspect to note is that we haven’t provided any code to handle the situation when the user came back and has already granted permission. This can indeed be an issue because there is no mechanism to automatically remove the alert box when permission is granted through App Settings. This is an aspect that should be addressed in your code logic to ensure a smoother user experience. To resolve this issue, we will use ‘WidgetBinding Observer’. Before proceeding further, let’s check what is ‘WidgetBinding Observer’.
The WidgetBinding class in Flutter is a concrete binding for applications based on the Widgets framework. It is the glue that binds the framework to the Flutter engine. This class provides a number of methods that can be used to handle various conditions in your application.
However, what truly matters is how this class can assist us in managing our specific conditions and how we can effectively implement them in our scenarios. So, let’s dive into this class to understand its practical application.
WidgetBinding Observer Class is an Interface for classes that register with the Widgets layer binding. and it provides a few methods but in our case, we need only one method called didChangeAppLifecycleState(AppLifecycleState state) → void this method is called when the system puts the app in the background or returns the app to the foreground.
@override
Future<void> didChangeAppLifecycleState(AppLifecycleState state) async {
 super.didChangeAppLifecycleState(state);
}
This method verifies whether the App’s lifecycle has changed or not. This check is crucial because, in our scenario, when a user presses the “openAppSettings” button, the App’s lifecycle transitions into a paused state. Subsequently, when the user returns to the app after granting permission through the App settings, the App’s lifecycle transitions back to the resumed state. Consequently, we will handle this permission condition as follows:
@override
Future<void> didChangeAppLifecycleState(AppLifecycleState state) async {
 if (state == AppLifecycleState.resumed) {
   if (await Permission.camera.status.isGranted) {
     Navigator.pop(context);
   }
 }
 super.didChangeAppLifecycleState(state);
}
Here, Our primary objective is to eliminate the alert box once the user has granted permission through the App settings. We have deliberated and established that upon returning to the app, the app’s lifecycle state will transition to “resumed.” Therefore, we need to involve a two-step process.
First, we check if the app is returning from the app settings screen by verifying that the AppLifecycleState is in the “resumed” state. Next, we check if the app has been granted the requested permission. If the permission has been granted, we close the dialog box (which is the current context) so that the user can continue using the app seamlessly.
In a specific scenario, the dialog box is used to inform the user that the app needs specific permission to function properly. The user is given the option to grant permission in the app settings. If the user grants permission, the dialog box is closed and the user can continue using the app.
Also we need to add this Widget binding observer into init State and dispose through the Dispose method.
@override
void initState() {
 compulsoryPermission();
 WidgetsBinding.instance.addObserver(this);
 super.initState();
}

@override
void dispose() {
 WidgetsBinding.instance.removeObserver(this);
 super.dispose();
}
In the code snippet, we used addObserver and removeObserver methods to add and remove observers from an observable object, respectively. An observer is an object that is interested in receiving notifications from the observable object when it changes state.
‘addObserver()’ adds a WidgetsBindingObserver to the WidgetsBinding instance. This means that your widget will notify you when the application’s lifecycle changes. ‘removeObserver()’ removes the WidgetsBindingObserver from the WidgetsBinding instance. This ensures that your widget does not continue to receive notifications after it is no longer needed.
That’s it…! You can easily manage Flutter app permissions using the ‘permission_handler’ package. The example above shows how to request and check the camera permission, but you can use the same approach to manage any type of permission.
Explore More: How To Use ListView.builder With groupBy Method In Flutter
In this blog, we have addressed a common challenge Flutter developers face when handling permissions in their apps. Specifically, we have explored the scenario where users deny permission initially and then grant it later through the app’s settings. The problem arises when the app doesn’t update the permission status correctly and leaves the user stuck with an unnecessary dialog box.
The provided solution ensures a smoother user experience by automatically removing the alert box once the user has granted the necessary permission through App Settings. By implementing these techniques, Flutter developers can enhance their app’s functionality and user-friendliness when it comes to handling permissions.
If you are still facing any challenges in developing Flutter applications, CodeTrade India can help. CodeTrade India has a team of highly experienced Flutter developers who are ready to work with you to create high-quality Flutter apps. Feel free to contact CodeTrade today!
Abhishek Karad Abhishek Karad
 Abhishek Karad
 Abhishek Karad
 Abhishek Karad