
Mobile App Development
 Abhishek Karad
12 November 2025
Abhishek Karad
12 November 2025
How to choose the Best Flutter App Development Company in the USA in 2026
 Abhishek Karad
Are you a Flutter developer or iOS developer, and you’re tired of uploading ipa files on testflight with the manual approach and looking for some automation approach by which you can save your time and make yourself more productive? Don’t worry, you’re at the right place. Here we will guide you to achieve the same. We are gonna use Fastlane for the CI/CD pipeline.
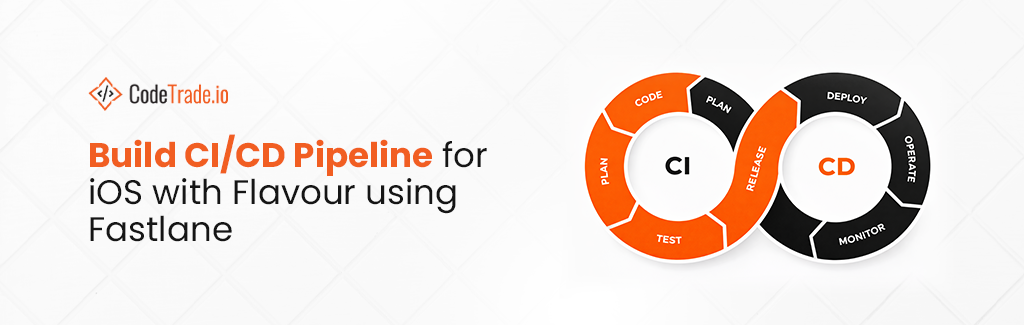
Continuous integration and continuous delivery (CI/CD) is a set of practices that automates the software development and delivery process. CI/CD pipelines can help teams to build, test, and deploy their software more quickly and reliably.
A CI/CD pipeline for iOS is a set of automated steps that build, test, and deploy your iOS app. It is a way to streamline your development process and ensure that your app is of high quality and ready for release.
Let’s deep dive into the CI/CD Pipeline for iOS with flavour using Fastlane. With the example of the CI/CD pipeline for iOS, you can better understand the flavour using Fastlane. We use the ‘com.example.flutter.app’ package name (bundle identifier), in this package name we have three flavours.
Before you proceed with the CI/CD pipeline integration with Fastlane, it is essential to have –
To add upload TestFlight using Fastlane, you will need to follow the given process:
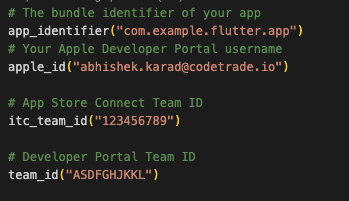
Make changes in Fastlane AppFile according to your requirements. In our example, we make changes in the Fastlane Appfile as shown below code,
# The bundle identifier of your app
app_identifier("com.example.flutter.app")

# Your Apple Developer Portal username
apple_id("[email protected]")

# App Store Connect Team ID
itc_team_id("123456789")

# Developer Portal Team ID
team_id("ASDFGHJKKL")
In our case, we use the following environment variables you can use the same if you want.
You can use these same environment variables in your own Fastlane Fastfile. To do this, simply add them to the ENV dictionary in your Fastfile. For example:
[email protected]
FASTLANE_APPLE_APPLICATION_SPECIFIC_PASSWORD=” Enter Your Password”
WORKSPACE=Runner. xcworkspace
EXPORT_METHOD=app-store
ARCHIVE_PATH=./build/Runner.xcarchive
OUTPUT_DIRECTORY=./build/Runner
DEV_APP_ID="com.example.flutter.app.dev"
STAGE_APP_ID="com. example. flutter.app.stage"
IPA_PATH=". /Runner. ipa"

Once you have added the environment variables to your Fastfile, you can use them in your lanes. Here, we will create only one public lane and the other will be private. you can make all three public if you want.
For example,
default_platform(rios)
platform :ios do
    desc "Flutter App"

    lane :flutter_app do
        flavor = UI. input ("Which Flavor do you want to upload? ")
        puts ("Generating '#{flavor}' Build...")
            case flavor
                when "dev"
                    flutter_app_dev
                when "stage"
                    flutter_app_stage
                when "prod"
                    flutter_app_prod
                else
                    UI. user _error! "Please choose the proper option: #{flavor. inspect]"
            end
    end
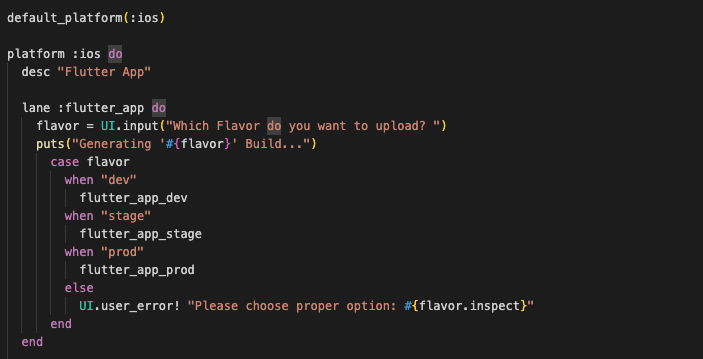
Here we’re providing definitions for the above lanes, for prod and stage lanes you can simply replicate this step by changing the app identifier. In our case, we provide definitions for the above lanes, for prod and stage lanes you can simply replicate this step by changing the app identifier.
Note: for production use `upload_to_testflight` only
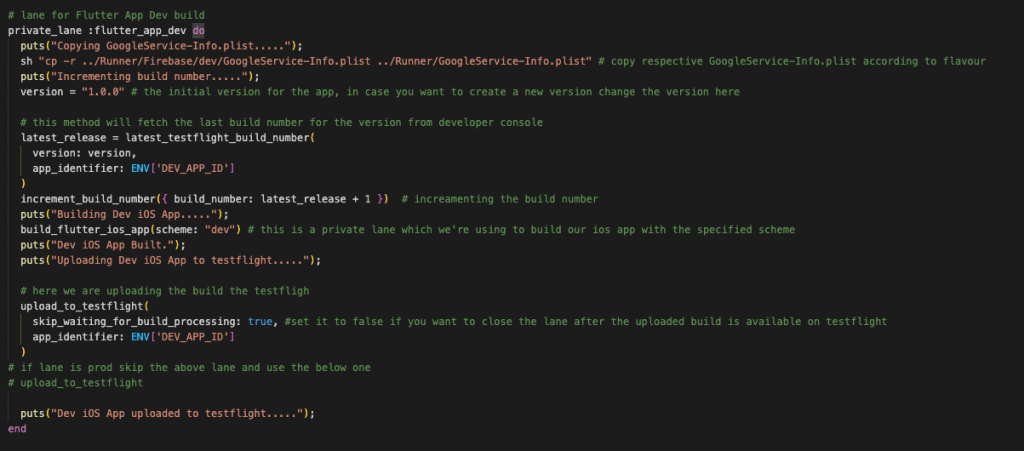
# Build lane for Flutter App Dev
private_lane :flutter_app_dev do
    puts ("Copying GoogleService-Info.plist.....");

# copy respective GoogleService-Info.plist according to flavour
    sh "cp -r . ./Runner/Firebase/dev/GoogleService-Info.plist ../Runner/GoogleService-Info.plist"
    puts ("Incrementing build number....");

# The initial version of the app, in case you want to create a new version change the version here
 version = "1.0.0"

 # This method will fetch the last build number for the version from the developer console
    latest_release = latest_testflight_build_number(
        version: version,
        app_identifier: ENV['DEV_APP_ID']
    )

# incrementing the build number puts ("Building Dev 10S App.....");
    increment_build_number({ build_number: latest_release + 1 })

# This is a private lane that we're using to build our ios app with the specified scheme puts ("Dev 10S App Built.");
build_flutter_ios_app (scheme: "dev")
 puts ("Uploading Dev iOS App to testflight.....");

 # Here we upload the build of the testflight
    upload_to_testflight(

#set it to false if you want to close the lane after the uploaded build is available on testflight
        skip_waiting_for_build_processing: true,
        app_identifier: ENV['DEV_APP_ID']
    )
    # If the lane is prod skip the above lane and use the below one
    # upload_to_testflight
    puts ("Dev 10S App uploaded to testflight.....");
end
Build an iOS app according to the scheme. In our example, We use the private lane to build the iOS app according to the scheme.
# This is another private lane that accepts schemes as flavours like dev, stage, prod
  private_lane :build_flutter_ios_app do |options|
    build_app(
      scheme: options[:scheme],
      configuration: "Release-" + options[:scheme],
      workspace: ENV['WORKSPACE'],
      export_method: ENV['EXPORT_METHOD'],
    )
  end

Now that we have written our Fastlane code, let’s test it out to make sure it works as expected.
Go to the terminal and execute the following command, In terminal hit the given command.
fastlane flutter_app
This will ask you the iOS flavour that you want to build i.e. dev, prod, stage

Once you have specified the flavor type, Fastlane will build and upload your app to TestFlight. The process will take some time to display results.
Note: When the first time you build your app with Fastlane, it will ask you to authenticate as a developer. This is the same authentication process that Apple uses in the Developer Console.
With Fastlane, you can easily build and deploy different variants of your iOS app to the App Store or TestFlight. This can help you to release new versions of your app more frequently and with less risk. In this blog post, we have shown you how to build a CI/CD pipeline for iOS with flavors using Fastlane.
If you’re looking for a leading iOS app development service provider in India, contact CodeTrade. With expertise and experience, we can help you build and deploy a high-quality iOS app that will stand out from the crowd. Contact us today to learn more.
Abhishek Karad Abhishek Karad
 Abhishek Karad
 Abhishek Karad
 Abhishek Karad