
AI/ML
 Chand Prakash
17 June 2026
Chand Prakash
17 June 2026
Digital Transformation in UAE Businesses: A Complete Guide
 Chand Prakash

In the realm of computer vision, object detection is a fundamental task that involves identifying and locating objects within an image or video frame. While numerous object detection techniques have emerged over the years, Haar Cascades stands out as a simple yet effective approach for real-time object detection. In this blog, we will explore how Haar Cascades works with Object Detection.
Haar Cascades, introduced by Paul Viola and Michael Jones in their seminal 2001 paper, utilize a cascade of simple features, known as Haar-like features, to efficiently detect objects. These features, inspired by Haar wavelets, capture intensity changes within an image and allow the algorithm to distinguish objects from the background.
The Haar Cascades method is a machine learning-based technique. It operates by acquiring discriminative features that distinguish the target object from the surrounding background through the training process which involves a substantial dataset of positive and negative samples.
The fundamental principle of Haar cascades is to first employ a series of effective simple classifiers to swiftly weed out non-object regions in a picture, then apply more sophisticated classifiers to get the ultimate determination.
Haar Cascades operate by employing a cascade of stages, each consisting of a set of Haar-like features and a weak classifier. The algorithm scans the image region by region and evaluates each region against the cascade of stages. If a region fails to pass a stage, discard it as a non-object. Regions that successfully pass through all stages earn the designation of potential objects.
OpenCV offers a user-friendly approach to implementing Haar cascades for object detection. Steps for implement Haar Cascade with OpenCV:
Execute the given command to integrate the OpenCV library into your virtual environment using the pip command.
$ pip install opencv-python -q
OpenCV provides a collection of pre-trained Haar Cascade XML files for detecting various objects, such as faces, eyes, and more. Additionally, you can find XML files for custom objects with a quick online search.
You have the option to utilize the pre-trained XML files included with OpenCV or obtain the appropriate one for your specific object of interest. The GitHub repository mentioned offers a repository of XML files that you can utilize.
Loading a Haar Cascade classifier in OpenCV involves using the ‘cv2.CascadeClassifier() function’. This function takes the path to the XML file containing the trained cascade as an argument. Here’s an example of how to load a Haar cascade for face detection:
import cv2

# Load the cascade classifier
#xml file for front-face detection
face_detector=cv2.CascadeClassifier(‘haarcascade_frontalface_default.xml’)

#xml file for Eye Detection
eye_dectector = cv2.CascadeClassifier(‘haarcascade_eye.xml’)
To identify faces within an image, employ the ‘detectMultiScale() function’ provided by the Cascade Classifier. This function takes a grayscale image as input and returns a list of rectangles, also known as bounding boxes, that encompass the detected objects.
#converting image BGR to GRAY
gray_img = cv2.cvtColor(img,cv2.COLOR_BGR2GRAY)

#function for detection of faces
results = face_detector.detectMultiScale(gray_img, scaleFactor=1.05,minNeighbors=5,
               minSize=(30, 30), flags=cv2.CASCADE_SCALE_IMAGE)
The parameters in the given example serve distinct purposes:
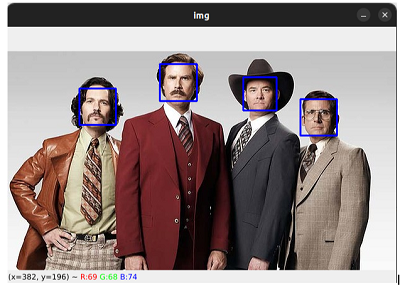
Let’s implement complete code and get the output of the given input data.
#import libraries
import cv2

#classifier for face detection
face_detector = cv2.CascadeClassifier('haarcascade_frontalface_default.xml')

#classifier for eye detection
eye_detector = cv2.CascadeClassifier('haarcascade_eye.xml')

#read image
img = cv2.imread('faces.jpg')

#convert image to grayscale
gray = cv2.cvtColor(img, cv2.COLOR_BGR2GRAY)

#detecting faces
faces = face_detector.detectMultiScale(gray, 1.3, 5)

#drawing bounding boxes on faces
for (x, y, w, h) in faces:
img = cv2.rectangle(img, (x, y), (x + w, y + h), (255, 0, 0), 2)
roi_gray = gray[y:y + h, x:x + w]
roi_color = img[y:y + h, x:x + w]

#detecting eyes for a particular faces
eyes = eye_detector.detectMultiScale(roi_gray) # Moved inside the face detection loop
for (ex, ey, ew, eh) in eyes:
   cv2.rectangle(roi_color, (ex, ey), (ex + ew, ey + eh), (0, 255, 0), 2)

cv2.imshow('img', img)
cv2.waitKey(0)
cv2.destroyAllWindows()
Using Haar cascades, we can perform an object detection process that can be extended to real-time applications or video analysis. The ‘VideoCapture() function’ serves as a valuable tool for capturing video input, whether from a pre-recorded video file or a live camera feed. By specifying the video file path or the webcam index, we can access individual frames for processing.
Let’s take an example to see how to implement real-time detection code with Haar cascades.
import cv2

# Load the cascade classifiers for face and eye detection
face_detector = cv2.CascadeClassifier('haarcascade_frontalface_default.xml')
eye_detector = cv2.CascadeClassifier('haarcascade_eye.xml')

# Initialize the video capture from your webcam (you can also use a video file)
video_capture = cv2.VideoCapture(0)  # 0 indicates the default camera
video_capture.set(cv2.CAP_PROP_FPS, 5)

while True:
   # Read a frame from the video capture
   ret, frame = video_capture.read()
   if not ret:
       break
   # Convert the frame to grayscale for face detection
   gray = cv2.cvtColor(frame, cv2.COLOR_BGR2GRAY)

   # Detect faces in the frame
   faces = face_detector.detectMultiScale(gray, scaleFactor=1.3, minNeighbors=5, minSize=(30, 30))

   # Iterate over detected faces
   for (x, y, w, h) in faces:
       # Draw a bounding box around the face
       cv2.rectangle(frame, (x, y), (x + w, y + h), (255, 0, 0), 2)

       # Extract the region of interest (ROI) for eye detection
       roi_gray = gray[y:y + h, x:x + w]
       roi_color = frame[y:y + h, x:x + w]

       # Detect eyes within the face ROI
       eyes = eye_detector.detectMultiScale(roi_gray)

       # Iterate over detected eyes
       for (ex, ey, ew, eh) in eyes:
           # Draw a bounding box around the eyes
           cv2.rectangle(roi_color, (ex, ey), (ex + ew, ey + eh), (0, 255, 0), 2)

   # Display the frame with detected faces and eyes
   cv2.imshow('Video', frame)

   # Press 'q' to exit the video stream
   if cv2.waitKey(1) & 0xFF == ord('q'):
       break

# Release the video capture and close the OpenCV windows
video_capture.release()
cv2.destroyAllWindows()
This code effectively demonstrates real-time face and eye detection using Haar Cascades in OpenCV. It captures video from the webcam, detects faces and eyes within each frame, and displays the results with bounding boxes.
The Haar Cascade technique stands as a powerful tool for identifying objects within images and videos. OpenCV’s user-friendly interface and extensive collection of pre-trained classifiers empower developers to readily implement Haar Cascade-based object detection. Whether you aim to build a face detection system or identify specific objects, Haar Cascades offers a versatile solution adaptable to a wide range of applications.
To enhance the potential for object detection in your projects, consider experimenting with Haar Cascades in OpenCV if you’re new to computer vision. Or if you’re looking for skilled AI/ML developers who can successfully execute your computer vision project, hire AI and ML developers from CodeTrade.
 Chand Prakash
 Hardik Soni
 Chand Prakash
 Chand Prakash
 Chand Prakash