
Open edX Development
 Chand Prakash
22 June 2026
Chand Prakash
22 June 2026
Open edX + AI Tutors: The 2026 Stack for Corporate Learning
 Chand Prakash

After you have successfully installed the Tutor Dev Koa release, you can mount the files and folders in your local system. If you need to review the installation steps for Tutor Dev Koa, follow the link provided for a smooth installation of the Open edX Koa release.
In Tutor Dev Koa, mounting is the process of linking a local directory to a path in the Tutor Dev Koa container. This allows you to develop and test your code locally without having to deploy it to the production server. To understand the process of releasing Tutor Dev Koa, you first need to understand why we need to mount files and folders in Tutor Dev Koa. Also, in this blog, you can find how to change or apply a theme in your tutor dev koa Open edX platform.
You need to mount files and folders in Tutor Dev Koa to make them accessible to your Koa application. This can be useful for a variety of reasons, such as:
Serve static files, such as images, CSS, and JavaScript.
Store configuration files.
Share data between different parts of your application.
Develop and test your application locally.
Deploy your application to a production environment.
When you mount a file or folder, it establishes a link between the file or folder on the host machine and the corresponding file or folder within Koa. This enables the Koa application to access the file or folder by utilizing the identical path present on the host machine.
Let’s dive into the process of mounting in the tutor dev koa release.
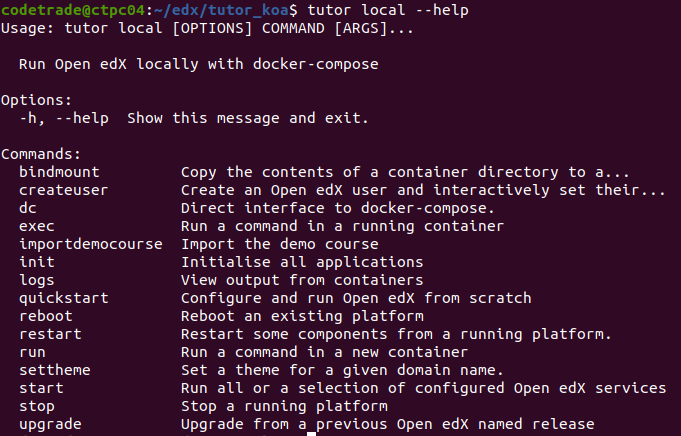
First of all, we need to check the tutor local – – help command.
$ tutor local – – help
The command displays help information for the tutor local command, which is used to deploy and manage a local Open edX platform using Docker.
To mount files from a container, you first need to copy them from the container to the local system. This can be done with the following command:
$ tutor local bindmount (service_name) (container_path)
As an example, we copied the LMS container directory during the mounting process.
$ tutor local bindmount lms /openedx/edx-platform

The same procedure should be followed for other services, such as:
$ tutor local bindmount lms-worker /openedx/edx-platform

$ tutor local bindmount cms /openedx/edx-platform

$ tutor local bindmount cms-worker /openedx/edx-platform

All mounted services are copied into a single folder called edx-platform, which is located at the below location.
/home/codetrade/.local/share/tutor/volumes/edx-platform
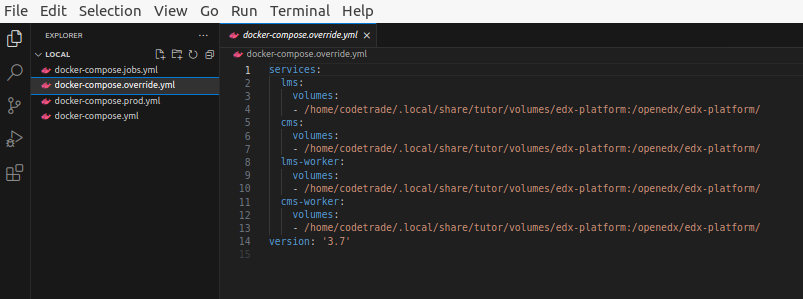
The koa tutor installation creates 3 files, but to save all the mounting we have to create a new file “docker-compose.override.yml” from the terminal:
$ nano “$(tutor config printroot)/env/local/docker-compose.override.yml”
In the file, store the services in the following format.
(local-volume-path):(container-path)
Use the bash path as the container path and add a bindmount volume path. Similarly, the above process is applied to all containers to mount, such as LMS, LMS-worker, CMS, and CMS-worker.
Check the docker-compose.override.yml file after mounting for the changes as shown below.
Once the file has been saved, stop the run containers by using the given command:
$ tutor local stop
And then execute the Start command to run containers
$ tutor local start -d
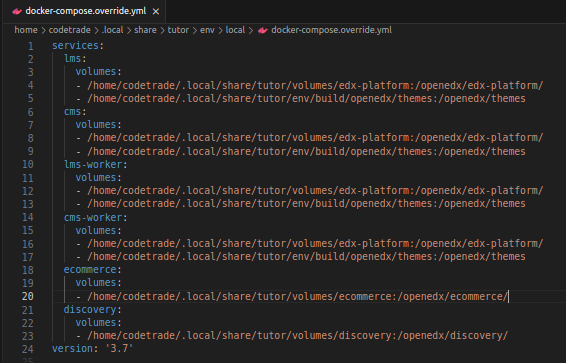
When the container file is mounted, we can make any changes we want and save them permanently. All these processes are running for every container mounting like eCommerce, and discovery.
In Tutor Dev, which is a development environment for the Open edX platform, you can apply themes to customize the look and feel of your online course platform. To apply themes in Tutor Dev Koa, you can follow these steps:
There are 2 ways to apply themes in Tutor Dev Koa:
Download a theme from the internet. There are many open-source themes available for Tutor Dev Koa. You can find them on GitHub or other websites. Once you have downloaded the theme, you need to follow the instructions in the theme’s README file to install it.
Apply an existing theme in your local system. If you already have a theme installed in your local system, you can apply it to Tutor Dev Koa by following these steps:
To apply themes in the Tutor Dev Koa release, first copy the folder of the theme you want to apply from the edx/tutor_koa/tutor/edx-platform/themes directory and paste them to the given directory.
$ (tutor config printroot)/env/build/openedx/themes/
$ tutor images build openedx

The given command is used to build the Docker images necessary for an Open edX platform. The tutor command is a tool that helps you manage and deploy Open edX platforms.
To apply themes on LMS we need to write the below command:
$ tutor local settheme (theme-name) lms local.overhang.io
For example, if we want to apply a red theme (or any other theme) to the LMS, include the name of the theme and proceed to execute the command.
$ tutor local settheme red-theme lms local.overhang.io

The lms.envs.yml file contains configuration settings for the Open edX LMS.
ENABLE_COMPREHENSIVE_THEMING: true
COMPREHENSIVE_THEME_DIRS: ["/openedx/themes"]
In the lms.envs.yml file, you need to check to make sure that the ENABLE_COMPREHENSIVE_THEMING setting is default set to true and that the COMPREHENSIVE_THEME_DIRS setting is set to the directory that contains your custom theme files.
Add the THEME_NAME in lms.envs.yml file
THEME_NAME: red-theme
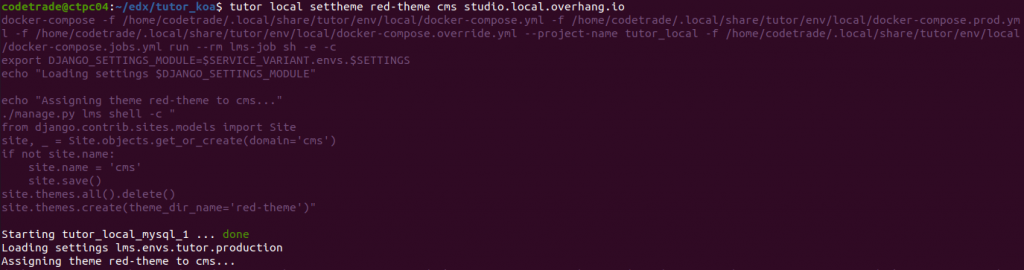
To apply themes on CMS we need to write the below command:
$ tutor local settheme (theme-name) cms studio.local.overhang.io
For example, if we want to apply a red theme (or any other theme) to the CMS, include the name of the theme and proceed to execute the command.
$ tutor local settheme red-theme cms studio.local.overhang.io
The cms.envs.yml file contains configuration settings for the Open edX CMS.
ENABLE_COMPREHENSIVE_THEMING: true
COMPREHENSIVE_THEME_DIRS: ["/openedx/themes"]
In the cms.envs.yml file, you need to check to make sure that the ENABLE_COMPREHENSIVE_THEMING setting is default set to true and that the COMPREHENSIVE_THEME_DIRS setting is set to the directory that contains your custom theme files.
Add the THEME_NAME in cms.envs.yml file
THEME_NAME: red-theme
Note: You can copy any of the theme folders from the edX-platform/themes path and paste it into the /openedx/themes path.
Next, Add a path to the docker-compose.override.yml.
Then restart the server for LMS and CMS using the given command.
$ tutor local restart lms
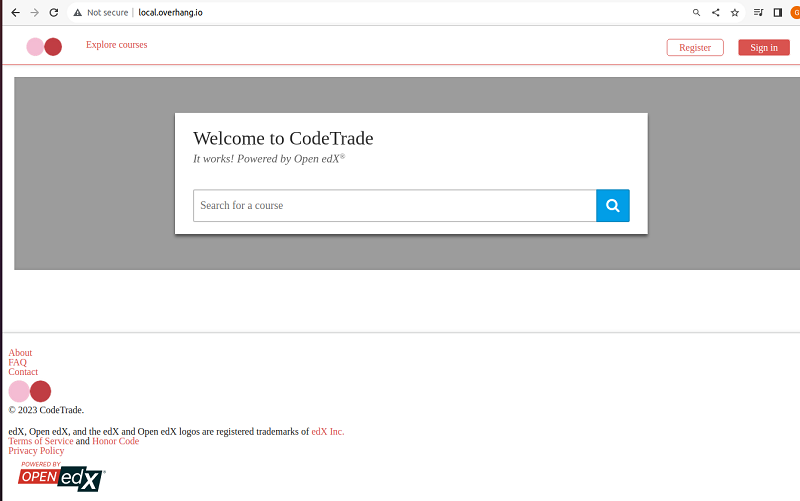
When we execute the command for lms, it looks like,
For CMS
$ tutor local restart cms
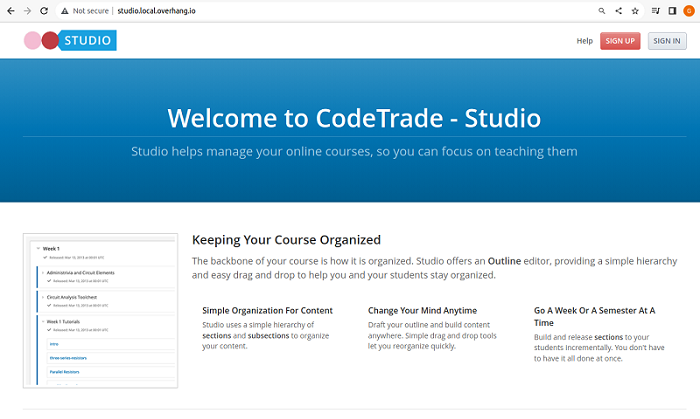
When we execute the command for cms, it looks like,
Congratulations! you have successfully installed themes for your CMS and LMS Open edX platforms.
The mounting and changing themes process in Tutor Dev Koa is a relatively straightforward process. By following the steps outlined in this guide, you can easily change the look and feel of your Tutor Dev Koa application.
For expert assistance with Open edX projects, contact CodeTrade India, a leading Open edX development agency. Hire dedicated open edX developers from CodeTrade to fulfill your open edX project according to your specifications.
 Chand Prakash
 Chand Prakash
 Chand Prakash
 Chand Prakash
 Chand Prakash