






Odoo Development
 Hardik Soni
14 October 2026
Hardik Soni
14 October 2026
How to Create a Form View in Odoo 20?
 Hardik Soni
Odoo 20 client actions are specialized triggers that hand interface rendering directly to the browser runtime. Standard views manage relational data well enough for basic administrative tasks. Custom business operations incorporating Odoo 20 AI features demand total layout freedom to function efficiently.
Specialized point-of-sale screens and telemetry dashboards require highly adaptable interfaces. Relying strictly on default forms creates significant workflow bottlenecks for end users. According to Gartner, 80 percent of large software engineering organizations will deploy reusable custom components by 2026 to resolve these UI limitations.
This article provides a sequential, production-ready process showing how to create client actions in Odoo 20. You will learn the exact steps needed from the base XML setup to live execution.
We will explore how to use client actions in Odoo 20 to build specialized user interfaces. This architectural pattern fits cleanly into the broader security and menu registry of the ERP platform. Mastering Odoo 20 frontend development gives engineering teams complete control over the web client experience.
An Odoo 20 client action operates as a specific record within the ir.actions.client model. It routes execution directly to a JavaScript component instead of a traditional database-driven view. This method bypasses the standard XML rendering engine entirely.
Standard window actions rely heavily on the server to render trees and forms. Server actions execute Python business logic strictly on the backend database. Both methods require constant round-trip communication. Client actions move this execution context directly into the user browser. This architectural shift drastically lowers network overhead. It gives developers total UI adaptability to design highly complex interface layouts.
According to a 2026 IDC research report on enterprise application modernization, this architecture offers measurable benefits. Shifting data intensive operational interfaces to client-side component architectures reduces transactional server load by 28 percent. This reduction scales perfectly across massive multi-user enterprise environments.
The underlying mechanism driving Odoo 20 actions remains highly efficient. The Odoo 20 web client maps registered string tags within its local memory cache. It reads the requested action tag directly from the database registry.
The system then uses that exact string to instantiate the corresponding frontend module. This rendering process utilizes the advanced virtual DOM features of the Odoo 20 OWL framework. The interface updates dynamically without waiting for structural HTML from the backend server.
A structured Odoo client action implementation supports completely bespoke enterprise workflows. Engineering teams can construct specialized interfaces that break away from rigid grid constraints.
Common enterprise use cases for Odoo client actions include:
Prioritizing custom Odoo 20 development enables technical architects to build premium business tools. These customized frontend components feel significantly more responsive and capable than default generic views.
Building and deploying a client action requires five sequential steps. The process covers XML record registration and OWL component definition. It then moves to QWeb template rendering and asset loading. The final step involves dynamic Python triggering. Following this structured process avoids common runtime registration issues. It ensures the resulting interface scales smoothly under heavy user load. A methodical approach prevents the UI from stalling during complex data fetches.
You must first create the ir.actions.client record in an XML data file. Place this file inside the views or data directory of your module. This XML record registers the action within the core database registry. Odoo 20 XML actions require specific fields to function properly.
The id field provides a unique external identifier for the record. The name field defines the human-readable title for administrators. The tag attribute is the most critical component in this setup. It acts as the unique identifier for the JavaScript registry.
The target field determines exactly how the action opens. Options include current for replacing the main view. You can use new to open a dialog popup box. Fullscreen removes the standard navigation menus completely. You must also create an associated ir.ui.menu record. This exposes the action in the main ERP navigation bar. Strict naming conventions for the tag attribute are absolutely essential. Using a generic tag name easily causes module collisions.
Always prefix the tag with your specific module name. This ensures your Odoo 20 custom actions load correctly. Naming collisions cause silent failures in production environments. A well-defined XML structure prevents these deployment headaches completely. It keeps your module architecture organized and secure.
XML
<record id="action_custom_dashboard" model="ir.actions.client">
    <field name="name">Custom Dashboard</field>
    <field name="tag">my_module.custom_dashboard</field>
    <field name="target">current</field>
</record>

<record id="menu_custom_dashboard" model="ir.ui.menu">
    <field name="name">Dashboard</field>
    <field name="action" ref="action_custom_dashboard"/>
</record>Next, define the JavaScript component class for your interface. This class must extend the base Component within the Odoo 20 OWL framework. The component contains the core logic for your custom interface. You define reactive state variables inside the setup method. This method also handles all necessary component lifecycle events. Lifecycle events manage what happens when the component mounts or unmounts.
You must import the registry utility from @web/core/registry. Add your new component directly into the actions category. Use the exact tag string defined in your XML file. This links the database record directly to the frontend code.
Odoo 20 JavaScript syntax relies heavily on ES6 modules and modern standards. Proper Odoo JavaScript development requires strict asynchronous data handling. Network requests must use standard try-catch blocks to prevent UI freezing.
Handling these errors gracefully keeps the user experience intact. You should display visual loading indicators during data fetching. This informs the user that background processes are running smoothly. Mastering these concepts improves your overall Odoo 20 development skills. Structuring your component cleanly makes future maintenance much easier. It also allows other developers to read your logic quickly.
JavaScript
/** @odoo-module **/
import { registry } from "@web/core/registry";
import { Component, useState } from "@odoo/owl";

export class CustomDashboard extends Component {
    setup() {
        this.state = useState({ data: null });
    }
}
CustomDashboard.template = "my_module.DashboardTemplate";
registry.category("actions").add("my_module.custom_dashboard", CustomDashboard);The QWeb XML template defines the DOM markup for your component. It dictates the visual layout of your new interface. You bind this template directly to your OWL component properties.
Standard QWeb directives control the rendering logic dynamically. The t-name directive gives the template a unique identifier. The t-if directive handles conditional rendering of specific elements. The t-foreach directive loops through arrays to render dynamic lists.
Interactive event binding happens through the t-on-click directive. This connects button clicks directly to specific component methods. Knowing how to use client actions in Odoo 20 requires mastering QWeb.
Proper CSS class scoping prevents custom styles from leaking globally. Always wrap your template inside a unique parent CSS class. This isolates your styles from the global web client theme. Solid Odoo 20 frontend development relies on this strict CSS separation.
Failing to scope styles will break standard ERP form layouts. It causes cascading visual bugs across unrelated application modules. A clean template ensures a premium user experience across all devices. It keeps the visual interface crisp and highly responsive.
XML
<templates xml:space="preserve">
    <t t-name="my_module.DashboardTemplate" owl="1">
        <div class="my_module_dashboard_wrapper">
            <h2>System Metrics</h2>
            <button t-on-click="fetchData" class="btn btn-primary">
                Load Data
            </button>
            <div t-if="state.data" class="mt-3">
                <span t-esc="state.data.value"/>
            </div>
        </div>
    </t>
</templates>You must declare all your frontend files in the module manifest. Open the python manifest file and locate the assets dictionary. Add your files under the web.assets_backend bundle. This specific bundle loads when the main ERP interface boots up. Declare your JavaScript files, XML templates, and CSS stylesheets here. Odoo bundles these assets and serves them to the browser automatically.
This loading sequence guarantees the component registers before the user clicks. The framework minifies these files for faster network transfer. Incorrect relative paths cause the most common asset registration errors.
Missing XML templates will result in complete blank screen errors. The browser console will show a template not found warning. Double-check all file paths before upgrading the custom module. Missing commas in the manifest dictionary will crash the server update.
Correct asset management is a cornerstone of Odoo 20 custom module development. It ensures your module deploys flawlessly across different server environments. Proper asset bundling keeps the initial page load time incredibly low. This is vital for maintaining a fast enterprise user experience.
Python
'assets': {
    'web.assets_backend': [
        'my_module/static/src/js/dashboard.js',
        'my_module/static/src/xml/dashboard.xml',
        'my_module/static/src/css/style.css',
    ],
}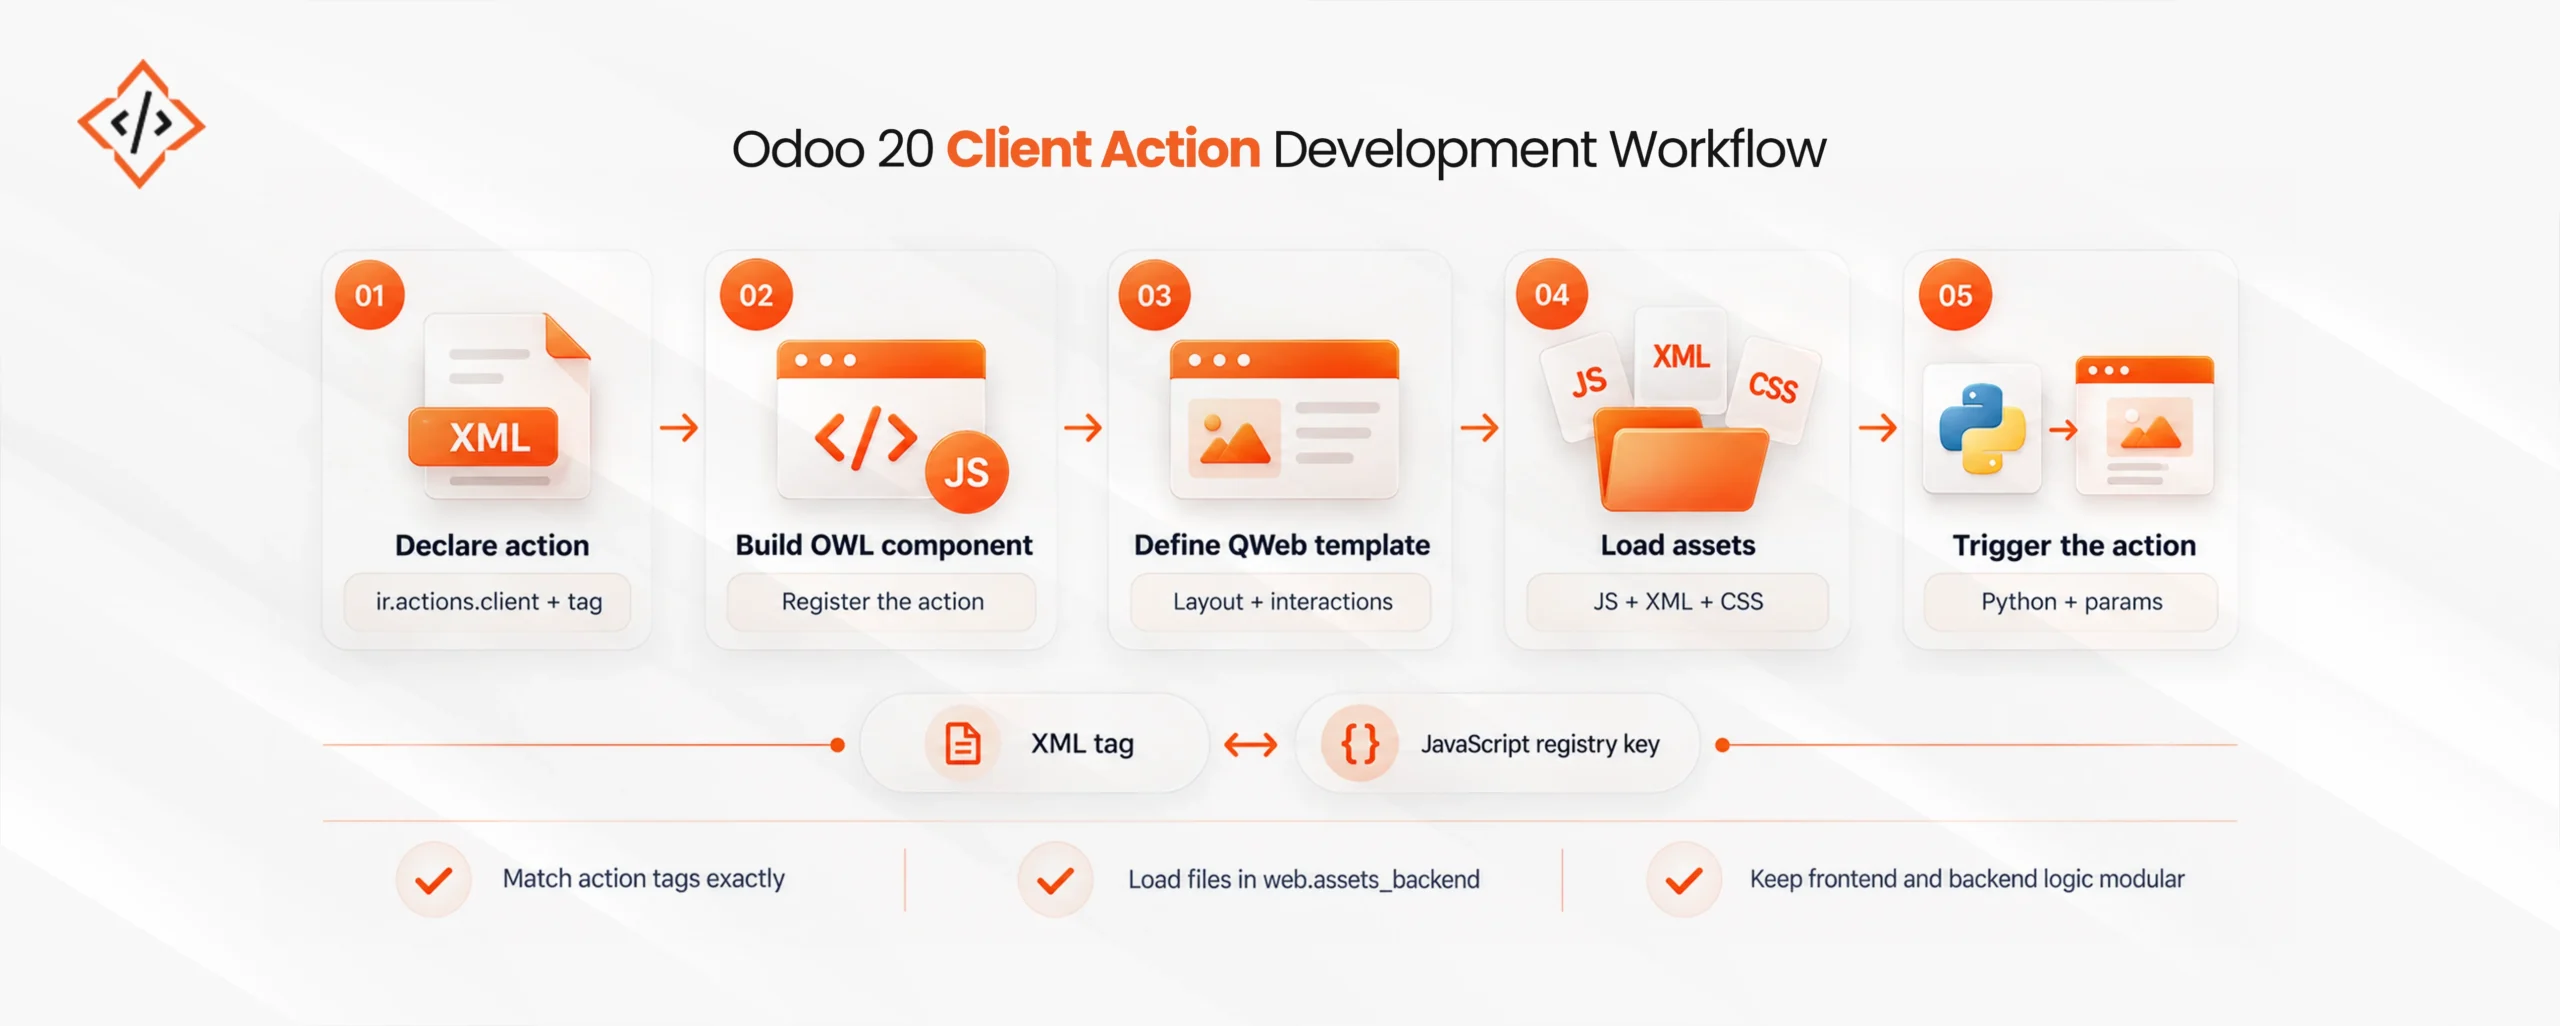
Backend Python model methods can trigger client actions dynamically. The server returns a dictionary instructing the browser to open the action. This dictionary requires the type, tag, and target keys. The type key must equal ir.actions.client for this architecture. The tag key must match your registered component string exactly.
You can also pass contextual parameters using the params key. The frontend consumes these parameters via props.action.params. This connects backend business logic directly to frontend views.
You can inject record IDs or custom flags through this parameter dictionary. Practical scenarios include validating a complex manufacturing order dynamically. You might also launch a dedicated approval wizard after changing a record state.
Client actions can also notify backend models of completed tasks. They utilize the standard RPC service to send data back securely. Implementing these triggers elevates your custom Odoo 20 development capabilities.
It bridges the gap between secure backend validation and fluid frontend execution. This bidirectional communication forms the backbone of advanced ERP applications. It ensures the interface reacts instantly to database state changes.
Python
def open_custom_dashboard(self):
    return {
        'type': 'ir.actions.client',
        'tag': 'my_module.custom_dashboard',
        'target': 'new',
        'params': {
            'record_id': self.id,
            'source_model': self._name,
        }
}Mastering Odoo 20 client actions allows engineering teams to construct advanced web interfaces. This approach eliminates the need to fight the rigid constraints of default ERP views. Adhering to the five-step process perfectly aligns backend data architecture with frontend component logic. Following these strict guidelines guarantees a highly responsive and stable user experience.
Moving these concepts from theory to production requires a methodical deployment strategy. Developers must thoroughly test these interactive components within secure sandbox environments first. This strict testing phase prevents critical failures before integrating new code into live enterprise instances, helping organizations manage their overall Odoo 20 migration cost.
CodeTrade delivers extensive technical expertise in building specialized Odoo 20 client actions for global enterprises. The engineering team designs highly optimized frontend modules that resolve severe operational bottlenecks effectively. Consult with CodeTrade technical architects to perfectly execute your custom Odoo 20 development roadmap.
 Hardik Soni
 Hardik Soni
 Hardik Soni
 Hardik Soni
 Hardik Soni