
Open edX Development
 Chand Prakash
29 August 2025
Chand Prakash
29 August 2025
The Secret Behind Fortune 500 Employee Onboarding? Open edX.
 Chand Prakash

Are you an open edX developer looking to set up Tutor Dev Lilac on your system? Don’t worry; In this step-by-step guide, we’ll walk you through the process of installing Tutor Dev Lilac on your system which ensures you have everything you need to get started on your open edX development journey. Let’s dive in!
Tutor Dev Lilac is a development environment for open edX and tutor is a powerful platform that allows you to create and deliver online courses to learners around the world. It provides you with a local setup of the open edX platform which enables you to develop and test your courses and applications seamlessly.
The Lilac release represents a significant stride forward for the Open edX platform. It empowers institutions, educators, and learners with enhanced tools, features, and experiences, setting the stage for even greater possibilities in online education.
With Tutor Dev Lilac, you can experiment, iterate, and innovate without the need for a live server to make it an invaluable tool for open edX developers.
Before you proceed with the installation of Tutor version 12.2.0 with the edX Lilac version, it is essential to have –
(Note: We tested on these Docker versions to install Tutor Dev Lilac)
Create a new directory named “lilac_tutor” for Tutor installations using the terminal.
$ mkdir lilac_tutor
Navigate to the directory to proceed with the further installation steps.
$ cd lilac_tutor/
Download the latest binaries, which are more helpful for installing Tutor, from the following link: https://github.com/overhangio/tutor/releases. Use the provided command line to do so. (In our case we have installed tutor version 12.2.0)
$ sudo curl -L “https://github.com/overhangio/tutor/releases/download/v12.2.0/tutor-$(uname -s)_$(uname -m)” -o /usr/local/bin/tutor
The provided command is designed to install Tutor version 12.2.0 and its dependencies from the Git repository of Tutor.

Use the command to assign permissions to that folder where Tutor is downloaded with root access.
$ sudo chmod 0755 /usr/local/bin/tutor
![]()
If you’re having trouble locating the correct file path for assigning permissions, you can utilize the provided command as a solution.
Set the path that specifies the location of the downloaded Tutor.
$ export PATH=”/usr/local/bin:$PATH”
![]()
Subsequently, execute the command again: $ sudo chmod 0755 /usr/local/bin/tutor to proceed with the installation process of Tutor Dev Lilac.
To confirm the version of Tutor, you can check it using the following command:
$ tutor –version
![]()
To initiate the Tutor installation, use the following command:
$ tutor local quickstart
During the installation process, you will be prompted to choose a Tutor installation type. As we are installing a development environment only, select ‘n’.
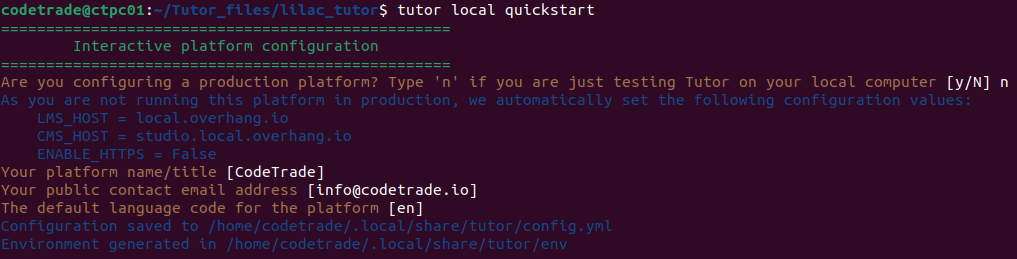
After a while, the installations will be completed, and the following services will be started:

Tutor has been installed successfully on your system.
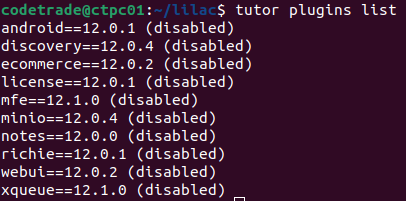
To access the list of available add-on plugins in Tutor, utilize the following command:
$ tutor plugins list
Use the given command to enable or disable any existing Tutor plugins
$ tutor plugins enable/disable

Before you proceed with the installation of new plugins, be sure to check if they are already pre-installed. If you’re considering installing a different version of a plugin, it’s necessary to uninstall the specific plugin first.
$ pip install tutor-(plugin-name)

After performing any operations in Tutor, remember to save the configurations in the config.yml file.
$ tutor config save

$ tutor local quickstart
After the installations are complete, access the following link for confirmation: http://local.overhang.io/

That’s it! You have now successfully installed Tutor Dev Lilac on your system. Now you have a local development environment to create, modify, and test your open edX projects with ease.
Installing Tutor Dev Lilac on your system is a straightforward process that opens up a world of possibilities for open edX developers. With its user-friendly setup and comprehensive development environment, Tutor Dev Lilac empowers you to create, customize, and test your online courses and applications with ease.
At CodeTrade, a leading open edX development agency, we understand the importance of a seamless installation process for Tutor Dev Lilac. Our team of experts is dedicated to providing top-notch support and guidance to developers like you, ensuring a smooth and successful setup of Tutor Dev Lilac on your system.
So, why wait? Reach out to CodeTrade for expert assistance and embark on a transformative journey in the realm of open edX development.
 Chand Prakash
 Chand Prakash
 Chand Prakash
 Chand Prakash
 Chand Prakash